Charcoal drawing is a great source to experience how art mediums can be raw, visceral and physical. For instance, when charcoal is pushed across the surface of paper, you’re able to hear the soft ‘scratch’ that it makes while it visually marks the surface. Not to forget the dust that slowly percolates in the air. The first time I held a charcoal stick, I was dumbfounded at how much of a ‘mess’ it could make while simultaneously being extremely beautiful, but that is what makes it interesting!
It creates the softest to the most dramatic of shades which makes charcoal drawing versatile. Using this, one can make high contrast or smooth gradients all under the same picture making it a go to for detailed or abstract work. Charcoal provides, space for creativity to run wild especially when trying to capture the softness of light against portraits or the nuances in folds of fabric during still life.
However, as any form of art, charcoal drawing is an art that requires buying some finesse. It isn’t simply making strokes on a piece of paper; there are techniques that lift your work from average to great. The most important part of working with any medium is to master the techniques necessary to turn out the most interesting and high end work. I recall how when I started I used to draw in dull shades without any effects. I did not know that the interplay of dark and light needed to be carefully managed or that mixing could enhance the vitality of a piece. It was not until I have been practising – really practising that I began to notice this.
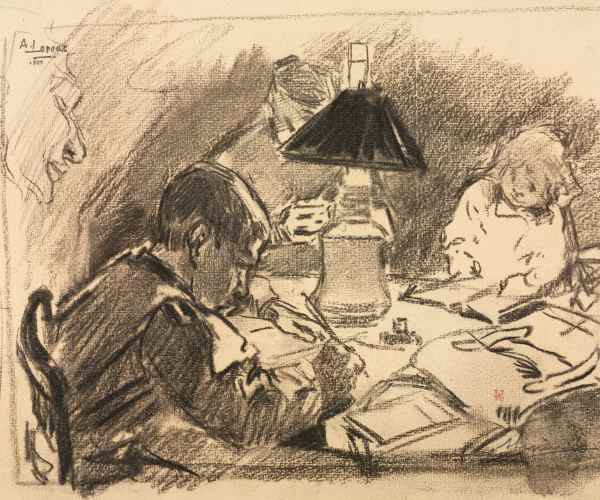
In this article, we will cover the fundamental principles behind successful charcoal drawings, discussing things like contrast between light and dark area, blending, and shading. Be it just your initial efforts at charcoal or it’s been a while already, these skills can improve your work. Even advanced practitioners may forget the simplest things, but trust me, moving back to those basic skills can reinvigorate your imagination.
Therefore, whether you need to improve your current skills or learn new ones, you are at the right place. You will not only enhance your charcoal drawings by learning these core competencies but also gain a proper insight into what exactly the medium is. And honestly, the moment you gaze upon the outcomes, getting back to the previous style becomes impossible, it is like an endless chase to get new unrealistic things out of charcoal.
Essential Techniques for Charcoal Drawing Success
- Essential Techniques for Charcoal Drawing Success
- One of the most important concepts to grasp
- Seamless Composition through Blend Techniques
- Employing Highlights To Define Shapes
- Managing Charcoal Dust: Clean and Effective Workflow:
- How can I keep my charcoal drawings from smudging?
- What type of paper is best for charcoal drawings?
- How can I produce crisp and sharp edges in charcoal drawing?
- Conclusion
Choosing the Right Materials for Charcoal Drawings
Using the right products is fundamental for creating stunning charcoal drawings. You wouldn’t know it when you’re starting, but finding a sketch charcoal or even printer paper- can really dampen your piece. It just wouldn’t blend, while the texture would be odd and everything appeared to be one shade. A bit counterintuitive, but it was my eye-opener —certain tools can define your art!
Charcoal is generally of three subtypes – pencils, compressed and vine, – it’s good to know all three come with their set of characteristics and tools in their craft.
Vine charcoal is ideal for color palette paints that require fine grain. It’s easily erasable and a good option to consider since, it does quite a bit of sketching without jeopardizing the quality of the piece and vice versa.
In order to achieve a broad deep shadow you would need Compressed Charcoal as it is much darker and thicker than the previous variant. If you are looking to make a strong scene, then this is it.
Charcoal pencils should always be your first option if fine detail with a rapid tip is required to get the job done correctly.
But here’s the dirty little secret: even the most perfect of charcoal will not perform if the paper is inappropriate. Paper mediums ‘tooth’ plays an extremely important part in how well it handles charcoal during application and blending. On one occasion, I mistakenly used the wrong paper for a drawing, I have never been able to blend charcoal into a soft grain, and it was never ending. A daunting scenario! However, I eventually came to appreciate that charcoal is best applied on rough, textured paper as it provides at least some surface to adhere to which makes blending and layering easier. So, experiment with different papers until you find what works best for you – it is just as crucial as the applying graphite or charcoal itself and, in fact, may even be more so.
One of the most important concepts to grasp
Light and shadow are a must for the charcoal drawing as that gives life to the drawing: thoroughly applying graphite charcoal correctly is most of the work as far as making the content seem engaging and realistic goes. By far, the most important thing that I grasped for myself: the more one observes real objects concerning how light effects them, the better he will be able to alter the contrast effect in his drawings.
In the early days of my art journey, the nuance of shadow or light was not something I invested much into. My artwork often comprised of rather strong, grainy strokes while gentle gradients were neglected during my workflow. That being said, for a drawing to be as realistic and deep as possible, it is crucial to employ gentle transitions as well, so as, to perfect the artwork.
One way to polish the art is to make use of a gradient that transitions from dark to light while only using hand pressure. Holding back while lightly pressing makes an indelible mark and pressing firmly results in dark shadows. This task is astonishing as it allows you a deeper understanding of how to make light flow in your artwork.
One of my portraits which remains embedded in my mind was one that which was quite simplistic in detail owing to the fact that I painted it with shadows that were rather underwhelming. Additionally, the attention I intended on paying towards the light was completely absent as well. As a result, rough it is to admit, the faces appeared to be rather flat and lifeless. I only began to notice a difference once changing the shadows of the cheeks around that has harsher edges, lesser domes, as well as the nose. The artistic work was undoubtedly nose after that. Such are the merits of comprehending light as well as shadow.
Seamless Composition through Blend Techniques
I believe one of the best aspects of charcoal is how it beautifully blends. I adore blending with charcoal because it allows for the smoothest after Toulon painting to be achieved it. The transition from light to dark with this technique is guaranteed to offer sheer depth and texture to the painting. The blending gets out all the charcoal across the painting but rather doing this one trick achieves the same thing as spreading charcoal that is designed to succeed with proper utilization.
For transitioning material blending stumps fingers as well as cloth wipe are undoubtedly the finest tools to utilize. Depending on the effect I wish to achieve, I frequently substitute among them. For larger areas, fingers seem to work well, and for smaller, stumps work well for smooth blending.
Here’s an interesting exercise that I adore: attempt sketching a basic sphere but without any outlines, only using blending. You could also begin with a dense shadow on one side and gradually lighten it up on the other side while using various tools to facilitate a gradual change. This exercise will help you boost your skills in blending as well as transforming shapes without the use of lines.
Employing Highlights To Define Shapes
Charcoal drawings are more than than merely shades and tints. Highlights and negative areas are also essential since they shape the whole form and enhance the drawing’s exposure realism. I noticed fairly rapidly that if I did not prepare my highlights, my artwork would be devoid of shadows and structure.
For instance, a knife eraser is one of my most frequently used tools for this task. It’s almost like magic! To obtain extenuating highlights in your drawing, you can use it to gently pull out the charcoal from the sheet. After you have applied shadows and midtones, You can use an eraser to pull out the bright areas of your figure where light has hit it. While it may seem like a minor detail, the impact is quite noticeable.
When I start off with a drawing, I always pay attention to what the light source is, if for some reason I don’t pay attention to that and don’t leave enough room for some highlights, everything might be too dim and dark since that’s where the highlights are supposed to go. So here’s a simple solution to that problem, always outline where your highlights will be even before you start shading it, it gives you a very clear picture of where you are headed. With that understanding you have, your aim will be to build the darks up while you are exactly aware of where you need to erase it for the precise light highlights.
Managing Charcoal Dust: Clean and Effective Workflow:
As I always clean up charcoal dust, I’ve learned the hard way that charcoal is indeed quite dirty, more so than I may have expected to be. Let us be honest with one another, I can’t tell you how many times I have messed a perfectly fine drawing by smudging it with the side of my hand or tipping over a stick of charcoal and dust blowing everywhere. You can make a considerable difference in how polished the final product looks by controlling that dust.
When it comes to your artwork you want to always have a little brush at hand to remove excess dust without blemishing your art. This small gesture can eliminate a lot of needless markings. Also, make sure you have got your fixative spray! It protects the drawing from smudging after it has been drawn, but also permits building layers without the charcoal coming off too easily. I don’t completely cover the drawing but use it lightly as amalgamating two layers to go deeper without altering the base is what I am after.
Interesting: Such fixatives help to reduce smudging but they can also work as a primer by slightly preparing the paper surface which gives the next charcoal layer something to bite into. That is one trick that is good to remember although it is a very simple one.
By understanding your materials, mastering light and shadow, and refining your blending and highlighting skills, you’ll be able to push your charcoal work to new heights. And a well-organized workflow means that you’ll spend less time on the messy side of things and focus better on your work!
Best of all, these methods are key to producing some phenomenal charcoal creations.
How can I keep my charcoal drawings from smudging?
Smudging is one of the most common problems facing the charcoal artist. Whether it’s the edges of your hand smearing parts of your charcoal work, or simply placing your palm down against a charcoal drawing and messing it up, I have lost parts of my work countless times. Fortunately, over time I have learned useful techniques that can greatly reduce smudging.
Essentially, a light coat of fixative spray is a ‘must’ because it leaves a protective shield around your artwork. Use it from time to time, particularly after you have completed a section of the painting you are satisfied with, and it will keep the charcoal in position so that you won’t have to be concerned about it spreading. However, don’t go too far as excessive fixative changes the consistency of the charcoal, and this makes it difficult to paint over.
A great and interesting trick would be to take a piece of paper and place it under your hand. This will help in keeping the oils from your skin to smear the hand movements made with the charcoal. I prefer to use tracing paper as it has a very soft and smooth texture, so it does not affect the charcoal underneath it much. This trick was able to save my drawings from several smudges.
Try to work from one side of your art to another, such as from the top to the bottom or from left to right (or vice versa if you are a lefty). You will be stepping away from the places that you have already drawn.
What type of paper is best for charcoal drawings?
The paper you are using for your charcoal drawings plays a major role. At the beginning of my art career, I unfortunately used lightweight and smooth-surfaced paper, and I used to often wonder why my charcoal was having such a hard time sticking. The right transition to ideal paper did help as I began to feel more in control while making the drawings.
The charcoal sticks better to paper with a rough texture which is also called tooth. Therefore, when using charcoal, choose a heavier grade paper. For final works, newsprint is not ideal as it is flimsy although it can be used for sketching as it is inexpensive and has a good texture.
Layering throughout the sketches is easy and blending is easier thanks to the texture. For models or ‘to be finished’ designs, a charcoal/pastel specific paper is recommended. 80-100 papers are appropriate as they are thick and are good at capturing charcoal. It is also less prone to bending or twisting during use. I would recommend getting either Canson Mi Teintes or Strathmore charcoal. The intricacies included in the nuances of charcoal use can be captured well by this. These papers capture intricacies well and come in a variety of shades giving the freedom to try both light and dark backgrounds.
How can I produce crisp and sharp edges in charcoal drawing?
Getting such sharp edges in a charcoal drawing can be quite difficult, but it can be done with the right tools and some practice. Using compressed charcoal instead of vine charcoal which is much softer is especially good for getting those edges, and drawing with precision. Compressed charcoal because of its density makes it more effective in controlling and creating edges while not being too spreadable.
Kneaded erasers are also a great tool for getting sharp edges, especially relating to charcoal drawings because you can mold them into a point and lift the charcoal off the paper where needed. Especially when wanting to shape the edges of highlights or wanting to get rid of excess charcoal to clean up a particular line.
Always try to go for broader strokes at first then as you start layering I suggest you slowly clean up the edges with an eraser or the side of a hard charcoal pencil. For example, when attempting to draw straight lines, arches, or any type of architecture you can utilize a tortillon to make getting those sharp edges easier.
Conclusion
In charcoal drawing, the emphasis is two fold, to attain balance and control. Control when it comes to light, shadow, and texture. Though it may take some time the idea is that the more you practice these techniques the more you will have a style of your own. Yes, the feeling of charcoal doing its own thing takes some getting used to, but the more comfortable you get with it however the more you see it as an versatile and expressive medium.
Every drawing is an opportunity to experiment with blending tools, contrast, and everything in between even those pesky charcoal dust. I have been drawing with charcoal for over a decade and there has not been a single moment where I don’t discover new ways to improve my skills, that’s the wonder of art, it never ceases to end.
So, why are still staring at these words while there is a whole world waiting for you behind that paper? You would be surprised by how creative you can get while all it takes is some charcoal and a kneaded eraser to do so. Now is the time to bring magic to the world through drawing!


