Acrylic paint is an interesting medium, mostly due to its vast array of colors and the fact that it is very forgiving making it ideal for most artists irrespective of their skill levels. It is a medium of paint made from pigment particles in an emulsion made from the polymer of acrylic. The most suitable thing about acrylics is the fact that while they are able to replicate oil or watercolors but they dry quicker and are easier to clean. They are suitable for quick drafts as well as complete works of art.
It is necessary to have knowledge of the various types of acrylic paints and thinners that can be added or compounds that have been added and their grades or rankings. This is critical information, since it allows one to decide what materials to use for painting, how best to use them and how to ensure that the painting itself will endure for many years without altering or degrading significant portions of the work.
If you wish to find more about acrylic painting whether it be for the sake of starting or the fact that you have already begun the process and are simply dabbling, this guide hopes to impart valuable insights. For someone with no previous knowledge of painting using acrylics this will be a good step to build a solid base. As for the people who are already experienced this will alter what they already know providing new art tips and explanations.
The Basics of Acrylic Paint
Acrylic paints are paint types that contain a combination of fine pigment particles and a polymer medium. It means that they are water-soluble, and once they are water-resistant, they dry. This implies that all we have to do to remove them is rinse them with water and when we let them fulfill their purpose, we are left with a very flexible film that is located on the canvas. When these details are pieced together, the outcome can be described as a vivid color with various textures on the canvas, and its evolution is what this article will be focusing on.
Evolution of Acrylic Paints and specifications unknown
As previously established, acrylic paints are a relatively recent advancement in the field of art that saw its take off in the late 20th century and remained relevant throughout. This mostly happened because pop artists sought a paint that was easy to work with and could be dried quickly and flatten out – and that is exactly the 50s and 60s responded to. But that was not the only use pop was retro acrylics paints were versatile in use as well. With time acrylics have come a long way from being multi purpose to being body fluid with matte and glossy finishes.
Why Are Acrylics Considered Better?
Due to the lifespan that acrylic colors have, they are widely favored. When Acrylics are used alongside oil paints, they leave a rather strong odor, not only that acrylics when fully dried tend to resist water which is why cleaning and maintenance is rather easy. Because they contain some elements of oil and are blended with dark colors, most artists favor them for more stunning results.
Acrylic Paints Explained: Students vs. Artists
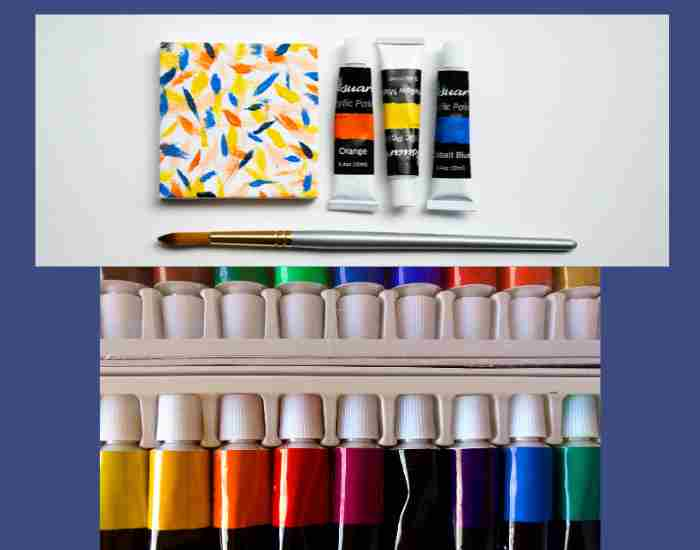
If you are planning on visiting an art supply store, be prepared to encounter two main grades of acrylic paints, the student-grade and artist-grade paint. Knowing the differences when it comes to each of them is important if you want to choose the right one for your artistic practice.
What are student-grade acrylics and what are its strengths and weaknesses?
Characteristics: The main difference between an artist-grade and a student-grade paint is the amount which the acrylic paint is formulated. Student-grade paints have more water content making them cheaper, and easier to work with which works to a beginners advantage. They are generally available in a plethora of colors which allows a beginner to test out a multitude of shades without a heavy investment.
| Pros | Cons |
|---|---|
| Affordable: Due to being less concentrated in terms of pigments, these paints are a great pick for anyone who is looking to practice without exceeding their budget. | Color Density: Because of the lower concentration of the pigments, the coverage required for deeper colors will be more as the density will be comparatively lower. |
| Easy Use: The ease at which they can be blended or manipulated is a major advantage due to lower pigment concentration. | Light Fade: The colors might become dull over the course of time due to the paints which are used being student-grade, having lower light fastness. |
| Variety: Many student-grade paints come in sets which allow them to experiment more with different colors. |
Characteristics, Advantages, and Benefits of Using Artist-Grade Acrylics
Characteristics: Artist-grade acrylics are composed of binders and additives that enhance their permanence and light fastness and have a higher pigment concentration that results in richer, more vibrant colors.
Benefits:
Rich Colors: The high pigment concentration helps in achieving intense and vibrant colors increasing the professional quality look of the finished artwork.
Durability: Artist-grade acrylics are of archival quality and are built for the long haul offering longevity and stability to your paintings.
Versatility: Artist-grade acrylics have a heavy-bodied consistency as well as a fluid form. This allows for a variety of art styles and techniques to be used.
Cons:
Expense: Artist-grade acrylics are more catered to advanced artists rather than beginners due to the price point as these paints are more expensive since they are of a higher quality than student-grade paints.
Learning Curve: Since the pigment concentration is higher, artist-grade acrylics may not be ideal for a person still learning the blending and layering techniques as a beginner.
Respected Companies and Products They Provide in Each Category
Student Grade Acrylics:
Liquitex Basics has a diverse color palette and is budget-friendly.
Winsor & Newton Galeria: Provides good quality options that are cheaper and efficient for starters.
Grumbacher Academy: smooth consistency and good coverage.
Artist Grade Acrylic Paints:
Golden Artist Colors established a high benchmark with its quality pigments and good color options.
A textured effect can be achieved with the thick and buttery outlines of acrylic paints that are offered in a liquitex collection. The Graham acrylics, on the other hand, stick to their upper quality pigments. Now taking note of the Graham acrylics let us dig into them: The grams provide high-quality and lightfast colors into their collection.
Acrylic Paint Mediums Exploration
The Role of Mediums in Acrylic Painting: Mediums are usually chemicals that are utilized in acrylic paints for the purpose of enhancing its transparency, altering its texture and drying period. Being able to employ several mediums is a great advantage to an acrylic painter as they can amend various effects on their paintings encompassing the paints properties.
Common Mediums: Additives, Retarders, Gels, And Suspensions
- Insert Retarders: The drying time for paints is crucial as an impatient artist can ruin a masterpiece through blending colors too soon, retarders were invented to aid such artists who prefer having a long drying time so they are able to blend without an overwhelming pressure of the paint drying too fast. Gels: They can be either heavy or light in texture and paints gels are used to include certain options for both Impasto techniques and textures because of a changed consistency in the paint.
- Additives: As it is common, many artists desire to smoothen their brushstrokes and effects like pouring, to help facilitate this, various additives such as flow improvers or extenders can be used. These additives do enhance the workability of paint.
- Glazing Mediums: These mediums assist the artist by making the paint more transparent which in result enables glazes and layered effects to be created. Glazing mediums also aid in deepening and enhancing the luminosity of the painting.
Applications and Techniques for Each Type of Medium
Retarders:
Application: Retarders can be mixed in with the paint, it is recommended to do so on the palette.
Technique: Directly ideal for colour blending and even colour transitions, simply apply it with a palette knife to add texture.
Gels:
Application: Mixing the gel with paint is a common way of applying it, however it can be applied as a layer separated from the paint.
Technique: Use a palette knife to create a textured surface with the gel, layer ‘gels’ for a more thick and depth filled look.
Additives:
Application: Mixing the additives with paint to facilitate better flow or even extend the drying period is the most efficient way of applying them.
Technique: Using smooth brushstrokes, the additives are especially useful when it comes down to large scale works.
Glazing Mediums:
Application: Mix the glazing mediums with paint to create detailed working layers.
Technique: Using Glazing mediums allows great atmospheric effects to be created along with depth through layered paint and additional color.
Guidelines to Follow When Choosing the Right Medium for Your Artistic Goals
- Think About Effects: Before starting to paint think about the texture, transparency and the amount of time you want your work to take. Always try to select mediums that are compatible with your requirements.
- Take Risks: Always be willing to try other mediums. Always use a small section of the medium first in order to ascertain its true effects before application of a bigger area.
- Learn Mix Ratios: Take note of how mediums are suggested to be mixed with paints. Knowing how much to use and how little to use is essential for true success.
- Observe and Document: Documenting artwork, the materials used and the techniques applied becomes essential for the replication of good results while avoiding lessons learned due to bad results.
Acrylic Paint Grading System
When it comes to the grading system for acrylic paints, this is yet another skill that each and every artist needs to master as it deals with judging the quality and suitability of acrylic paints for different types of work. Acrylic paints can come in two types of grades which are as follows: student grade and artist grade or professional grade. This system is very important as it provides guidance to the artist on how to select the paint appropriate for their various projects.
Factors Affecting the Grade: Quality of the Pigment, Lightfastness, Permanence.
- Quality of Pigment: This focuses on the kind and amount of colorants used in the formulation. Payer for artist-grade paint possesses higher-quality pigment which leads to richer and more pronounced colors. Student grades, on the other hand, are still decent, but may be higher in fillers and lower in pigment.
- Light Fastness: Light fastness is a definition of how much a pigment will fade when exposed to light. Artist-grade paint tends to have a high resistance to fading over time light-fastness ensuring accurate colors over time. Paints of student-grade quality may not possess good light-fastness which can be a red flag for artworks meant to be preserved.
- Permanence: Permanence explains the resistance of paints to all harsh agents such as weather, moisture, and fluctuations in temperature. On the other hand artist acrylics are said to have a greater endurance to such environmental conditions.
Decoding Labels and Symbols on Paint Tubes
There Is literature and graphics on paint tubes but they come packed with items that can be very useful. Here are several examples of things worth looking for:
- Grade Indicator: There are numerous terms used, ‘Professional’or ‘Artist’ are for the artist-grade paint and ‘Student’ for the student-grade.
- Pigment Information: This entails the type of pigment, name and character, even number can specify contrast and quality.
- Lightfastness Rating: This characteristic is usually expressed with a group of stars or a scale which ranks level of resistance to fading. The more stars or higher the number, the greater the retention.
- Opacity: symbols or text that indicates the transparency of the paint, that is if the paint is transparent, semi-transparent or opaque.
Working with Professional Artist Quality Grade Acrylics
Professional acrylic grade is heavy-duty paint that bring out amazing professional work especially if such work is meant to be sold, exhibited or preserved for future generations. These paints guarantee the quality, color and integrity of paint long after its application. For collectors galleries alike, and for the potential owners of the work, this is very important, because the work retains its color and integrity over time. Artist grade paints are well buffered meaning, the pigment and even distribution of the paint makes higher order precision and details possible which is ideal for powerful paintings.
More Post
From Classic Oil Paints to Cutting-Edge Digital Techniques ( The Evolution of Portrait Art)
The Impact of Street Art on Urban Culture and Community Identity (Exploring Iconic Murals)
Color mixing and palette selection
Athematic is the basis of all arts including visual arts, and it is exclusively relevant to acrylic painters. Here are the key elements:
- Color Wheel: Color wheel is a geometric diagram consisting of red yellow blue and orange, green, purple as the primary secondary and tertiary colors respectively.
- Hue, Saturation, and Value: In the language of color science, hue represents the color, saturation the strength of the color and value determine the lightness or darkness of the color.
- Complementary Colors: These are classified as colors that are opposite to each other on the color wheel. Results from mixing these complementary colors becomes neutrals or grays.
Primary, secondary, and tertiary color mixing
- Primary Colors: There are only three which are blue, red and yellow and they cannot be formed by mixing two or more colors.
- Secondary Colors. These are considered orange, green and purple which occurs when two primary colors are mixed together in equal amounts.
- Tertiary Colors: These can result from the mixing of a secondary color and an adjacent primary color, hence tertiary colors.
With more understanding of relation of such colors, an artist is able to mix even more colors thereby increasing the number of available colors in their paintings and in so doing giving their artwork a greater visual appeal.
Coming Up With A Balanced Color Palette To Suit Various Painting Styles
Monochromatic Palette. This involves the use of many shades of a single color. It gives an appealing and soothing effect which is suitable for minimal and subtle artworks.
Analogous Palette: This involves the use of colors that are next to each other in the color wheel. This ensures that the artwork is cohesive and works well.
Complementary Palette. This involves the use of colors from the opposite ends of the color wheel. This results in greater contrast and vibrancy but which should be used with caution to avoid overstimulating the viewer.
Split Complementary Palette: You select a base color and take the two neighboring colors of its complement. This offers contrast but still balance.
Triadic Palette: You pick three colors that are equally distant from each other on the color wheel. This assists in evenness and richness in view.
Tips to get hues and shades of your choosing
Limit Your Palette From The Start: Stick to basic colors for a start, and then as you get more confident in blending you can try out new colors.
- Utilize A Palette Knife: This tool helps to mix colors accurately and avoid over mixing preventing loss of brightness in the colors.
- Color Gradation: Shift from one color to the other in an orderly manner to avoid choppy transitions, this is especially useful for shading simulation.
- Corset Your Mixing In A Journal: You can record the mixtures of colors and the ratios perspectives. This way you are able to look back at this for the next art work.
Techniques and Applications (Fundamental Acrylic Painting Techniques)
There are numerous subgroups of technique subtypes of acrylic paint enabling the imagination of painters to flourish in many ways. Here’s a list of core techniques in no particular order:
- Brush Techniques: A good catch of brush strokes, brush varieties and its impact on canvases.
- Wet Paint: putting wet paint on only wet paint and no other type.
- Dry Brush: For some dabbing effects use up the dry bushes with little to no paint.
- Sgraffito: Painting in decoupage and then scoring to reveal sections underneath that were previously hidden.
- Palette Knife Techniques: Implementing a palette knife for paintings that have texture as well as large strokes.
- Laying, Glazing, Impasto and Other Techniques that are Complex:
- Layering: The achievement of depth through multiple layers that may be feeble or opaque.
- Glazing: Thin layers of color are pinched onto the surface to get a glowing effect.
- Impasto: Thick paint layers are put on surfaces with the use of multiple tools.
- Scumbling: Gently applying a light shade of paint over a dark dry layer to create haze.
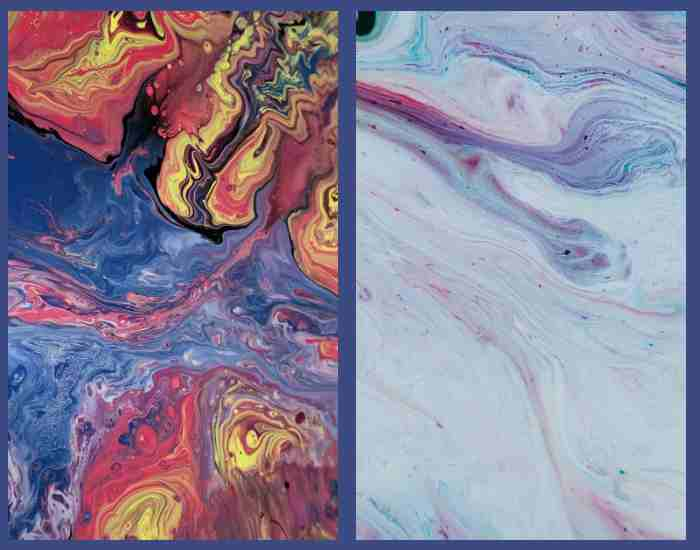
- Pouring: Spreading acrylic over a work in order to create abstract and unusual designs.
Renaissance Body of Works and their Styles I Different Genres:
- Realism: Through extreme detail and observation being able to recreate something to look as it is lifelike.
- Abstract Expressionism: Being active in motion and feeling, bringing them to the canvas with large hand strokes and a free hand.
- Impressionism: Re painting a picture and conveying the main thing giving brightness and broad brushstrokes.
- Mixed Media: Use of collages texture mediums alongside acrylic.
Classic Acrylic’s step by step guides to the most practiced art forms:
- Sunset Landscape: Techniques where a picture can radiate vivid colors and be blended to create a sunset.
- Floral Still Life: Creating layers and layering glaze upon it to mimic the petals on the flowers.
- Abstract Geometric Art: Using masking techniques then layering bold paints helping accomplish modern aesthetics to a painting.
- Animal Portraits: A detailed and breath taking depiction of an animal with the dry brush technique.
Procedures for protecting acrylic impressions
Guidelines on the Keeping of Acrylic Paints
It has to be kept in a cool and dark environments. Ensure the paint is not heated or exposed to direct sunlight to retain its quality
Proper Sealing of Tubes: Firm application of the caps prevents the product from drying out and going to waste.
Labelling and Color Storage: A well organized color storage to enable quick access if needed.
Proper Care of Acrylic Art Works for Preservation of their Lasting Effects
Shield from Ultra Violet Rays: Paintings should not be placed where they are exposed to direct sunlight to avoid fading of the colors.
Stable environmental conditions: Artworks should not be kept in areas with too high humidity or temperature.
Use Appropriate Materials that would ensure Longevity: Sticking the image to acid free canvases, boards and framing materials.
Proper Cleaning and Care of the Brushes, Palettes, and Other Tools
Avoid Leaving Dry Paint on Brushes: Soaking the brushes as soon as they are used eliminates dry paint from the bristles.
Cleaning Brushes: Strong solvents should not be used instead mild soaps and water would work more effectively.
Proper Care and Handling of the Palettes: Regularly scrape away dry paint from the mixing area around the color wheel to get the best mix.
Resolving Difficulties Associated with Acrylic Paintings
Paint cracking: To avoid the paint cracking don’t thin it too much and do use flexible bases.
To avoid drastic and convoluted color changes, apply paint colors on a small area of the art piece before proceeding to the rest. This takes away the risk of making a huge mistake should the color be incorrect and to further more, make sure it is even or else the entire piece shatters the vision. It’s smart to first apply the colors on a small part and see how those look.
While working on your dry paint, control the time it takes for it to dry using mediums or adjusting your environment. Drying times can vary when mixing paints from using an open workspace to using mediums. Tools such as a hair dryer can also be implemented as well.
Sources: Resources to Read and Websites to Visit
- The AAD Online Courses: Websites like Skillshare, Udemy, and Coursera are great for anyone trying to learn Advanced techniques from Stylism to Pattern Making and Layering. They even offer beginner courses for acrylic painting!
- The AAD: Websites like ArtInstructionBlog.com and GoldenPaints.com are great for seeking help with different types of themes, product ideas, or simple tips and tricks related to painting and art.
- Essential Guides: Look for well written books such as “Color Theory: An Essential Guide to Color” and “Acrylic Artist’s Bible” these can help further deepen your understanding on acrylic painting in general and let you master more techniques.
Forums and Online Communities for Acrylic Painting
Online Communities: Websites such as WetCanvas and The Artist’s Magazine Forums are great for trades of knowledge for single topics or even vast multi-topic related painting and art techniques.
- Social Medias: Try joining Facebook and Reddit communities that encourage critiques on work shared to help other users grow as an artist by developing their skills.
- In-Person Classes: Try joining an art community or an art center near your vicinity, these often not only provide classes on different techniques and ways of painting, but also arrange meetups for individuals of unlike genres to socialize.
Exhibitions, Workshops And Events Associated With Acrylic Painting
Art Exhibitions: Look for local galleries and art shows which feature acrylic painting and go there for a visit in order to be inspired and for different styles
Workshops: Sign up to workshops organized by professional artists or local art shops because such events are the best way to learn.
Events: Go to art fairs, exhibitions or open studio events so you can meet artists and see the many types of acrylic painting in practice.
Indications On How To Grow A Network In The Exquisite World Of Acrylic Painting
Participate in Art Shows: Show your artwork in local art fairs and meet other artists as well as mentors who can guide you.
Social Media Engagement: Post your work on Instagram and comment on other artworks to connect with fellow artists as well.
Art Classes and Workshops: Joining classes regularly gives you an opportunity to interact with instructors and fellow students.
Volunteer: When you take part in art related events or groups and offer your help you have better chances to meet many people and expand your network.
What is the distinction between student-level and artist-level acrylic paints?
The difference chiefly has to do with the amount of pigment used, the quality of raw materials and the consistency. Artist-grade acrylics have more pigment and fillers are less in amount which makes the colors more vivid and increases their lightfastness. student-grade paints are relatively inexpensive—but contain lower concentrations of pigment and contain fillers ,which makes the resulting color less vivid and probably fades quicker. Artist quality paints, meanwhile, further expand the spectrum and color consistency allowing them to be employed with complex technologies and professional artwork.
Is it possible to combine different brands and types of acrylic mediums?
Acrylic mediums of different brands and types can be mixed together, yes. All the mediums used are made to be used together with acrylic paints regardless of the brand. It is useful however to examine each type of medium beforehand, as all of them have an influence on the texture of the paint, the drying speed and the end result of the painting. As always, begin with a small sample to test how the mediums will work with one another and with the paint.
What considerations do I need in order to best select the grade of acrylic paint suited for my project?
The phenomenon of deciding what grade of acrylic paint to apply bears dependence on three factors which are skill level, the requirements for the project and one’s budget. In case of being a beginner or an individual who is starting out, student-grades are an excellent investment. On the flip side, professional artists and those who are gearing up to deliver high quality work which is upto the mark to be up for sells, students grades are not a good fit, instead opting for artist-grade paints is a better fit. When doing activities such as working on a mixed media project along with compiling experiments one may easily settle with student-grade to balance the costs.
Conclusion
The aforementioned activity is a process in which guidance is provided to enable a person to fully understand the requisites of acrylic paint. Such as understanding the importance acrylics bear as the appropriate medium alongside the variety of techniques and styles that exist and have been used on acrylics. The protection and maintenance of acrylic paint is an important aspect to keep in mind while understanding the output desired alongside desired further resources.
As you read this guide, remember to treat it more as a starting point. Be willing to try out different mediums, styles, and techniques. Each artist has their own journey, and there is so much to explore in acrylic painting in today’s world, so don’t be so easily deterred from discovering your way.
Painting with acrylic paints allows for a wide range of exploration and is appealing to both professional artists and novice alike. It dries quickly and is easy to work which is essential when examining ideas and forms of expression. There is a large scope for painting with acrylics – from capturing the ethereality and the complexity of light in a composition to expressing sheer abstractive concepts. So do keep painting, do keep experimenting and allow your thoughts and creativity to be expressed through each brush stroke!
More Post
Most Common Standard Photo Sizes and Aspect Ratios