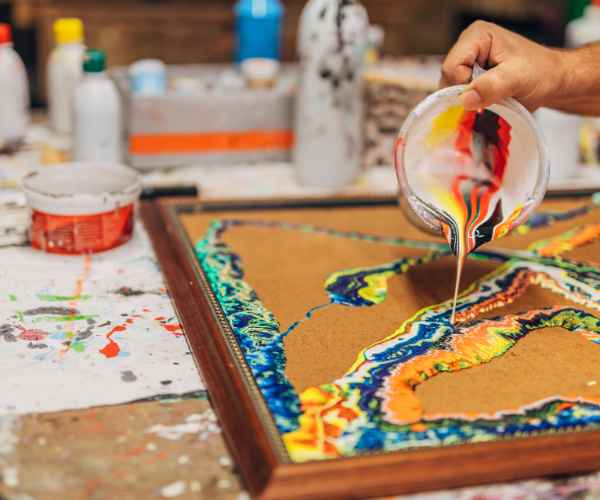
Paint-pouring is a fascinating and engaging type of art that has gained considerable popularity to artists and art lovers due to its unexpected results. The method is also referred as also fluid painting or acrylic pouring. In this particular case, we will consider the basic principles related to paint pouring, its relevance to the acrylic pouring technique and the fluid painting technique.
Acrylic pouring is a category of painting pouring that uses only acrylic paint. The nature of acrylic paint, due to its liquidity and drying, in particular, suits well for this technique that is highly spontaneous and experimental. In contrast, fluid painting is much broader as it includes other types of mediums besides the use of plain acrylics expanding the frontiers of art and chemistry.
Mastering Paint Pouring Techniques
The core of paint pouring is the ability to manipulate the flow, which allows the artist to get the effects and patterns that they are seeking. Paint pouring uses acrylic, a medium that the artist can play around with owing to its extensive array of colors. Being able to master these techniques that allow the artist to get the flow they desire requires an understanding of how acrylic paint behaves when it is poured.
Examining the Integral Tools
Let us not forget, that there are essential tools that once mastered, allow the artist to pour paint without any restrictions on its flow. All tools are equally important in achieving the desired outco,e during pouring so understanding the functions of each of these pieces is the first step in achieving the ideal result.
Canvas: The canvas you use determines the type of painting you would create, therefore it is of utmost importance. The type of canvas can dramatically impact the way the paint moves and how it settles once it is placed, as each canvas has its own level of absorbency and variety in texture. The use of multiple canvases opens up a range of new avenues in relation to the patterns and textures that you can create on the canvas.
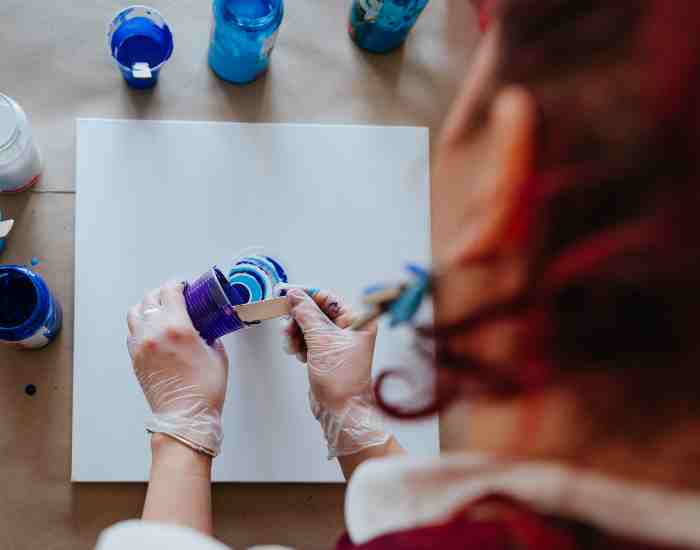
Pour Cup: There are many tools that an artist needs to further their craft and pour cups are one of them. They allow the artist to pour paints with control making it an amazing tool that allows for so much creativity. The cups come in different sizes and shapes which allows for there to be so many different patterns that can be created.
Pouring Medium: These are essential for maintaining the consistency and flow of your paint. They allow for a texture to be poured but while maintaining the colors meaning that the integrity of the colors will not be lost. This enables artists to go for different pouring mediums which helps them have different effects on the texture.
Acrylic Paints: The paints that you choose can massively affect how well your paint pouring technique goes and how well it would work so that’s why using acrylic paints of a specific brand is recommended as they provide vibrant pigments with incredible fluidity. This further means that the artist can use a variety of colors and brands which match their style and how they want their painting to come out.
Understanding Surface Tension
Surface tension is a characteristic of liquids that is fundamentally important in determining how liquids behave when placed on other surfaces. In the case of paint pouring, surface tension is important to control the pour and flow of the paint to achieve the desired patterns.
As paint is poured, it will seek to cover the surface to which it is applied as much as possible. In this case, the paint’s surface tension describes how it will function. It is possible to change the paint’s surface tension by altering its viscosity or adding certain agents.
Pouring Process
With broadband knowledge of surface tension, artists are able to direct the paint, define borders , and even manipulate the cells and the patterns which grow. Artists are able to maneuver the pouring process in such a way as to integrate an aesthetic point of view with resentful tendencies by knowing the relationship between surface tension and different surfaces.
Different Types of Pouring Techniques
When it comes to paint pouring, artists have nurtured a generous number of paint pouring techniques to get different and beautiful results. Every technique enhances the process in its own way and in distinct ways and that makes it easier to demonstrate artistic approaches in many ways. In this section we are going to briefly describe a few of the more common pouring techniques: dirty pour, flip cup and the good old acrylic pour.
Dirty Pour Dirty Pour is one of the simplest techniques as this involves pouring different colors from a single cup onto the canvas. The colors blend together when they are poured, resulting in merging of colors. This process indeed allow for complex color mixes and artists love this one because of the interplay factor and surprise in the finished work. Flip Cup The flip cup is quite an interesting technique because it tends to introduce an element of chance into the painting. Artists will pour paint of various colors into a cup and then pour the cup upside down onto the canvas. Water color patterns and compositions are formed once more as the paint is released and the colors smear across the surface. It is documented that this particular technique produces quite loud results. Acrylic Pour For me the simplest technique is acrylic pour, especially as it entails pouring the color directly onto the canvas. Artisans have control over where the paint goes and. Therefore, this technique is great to make certain shapes through the use of color combinations although the intention is not disrupt the flow of the paint too much.
The Role of Cells in Pour Painting and Their Special Effect
One striking feature in pour painting is the emergence of cells which are tiny circles formed during the combination and setting of the paint. Cells give the painting a charm and uniqueness that is difficult to recreate. Pouring cells into paintings is a common practice among many artists, who use silicone oil or hair picks in order for cells to form and flourish.
Use of Spoons and Pantyhose to Create Unique Features
In order to differentiate their pour paintings even further, artists often use strange thumb brushes, spoons or even pantyhose. When modeling the texture of the strokes with a spoon, a new pattern is created which is intriguing in itself. While socks are being stretched or manipulated on the canvas, stitches can be made which also add texture to the painting.
Preparing Your Work Area
To ensure a quality paint pouring session, it is imperative to have an organized and a suitable workspace. It does not matter whether you are an expert or a rookie, considering various ideas to set up the art area goes a long way in improving the quality of painting. To ensure your artistic experience remains simple and clean, in this subsection we shall explain how to arrange your art space.
Arranging The Art Area
Acquire all the essential wok materials comprising paper cups as well as baking paper. To begin with, paper cups are ideal containers used in mixing and pouring your paint. They are single-use which makes cleaning simpler and also add to controlled pouring because they are reusable. Baker’s paper which resembles wax paper is quite useful wrt placing your canvas and other surfaces while pouring as it prevents your work area from mess and ensures that your painting is peeled off easily once it has dried.
Paint pouring tools require a paint pouring setup in an open and easy access area having all tools at arm’s length. That would eliminate the time wasted in finding third party objects and instead let you concentrate entirely on your art.
Light And Air For Even Texture
Working with acrylic paints and pouring mediums requires plenty of work in terms of air flow. The fumes produced when pouring paint tend to be strong so proper air circulation ensures that any potential health problems are minimised. For instance working indoors in a well ventilated space or placing yourself next to an open window. Wearing a face mask can further reduce your respirations.
Suitable lightning for consistency
Instead, make sure your room has good consistent lighting so that you can see the colors well enough to get the paint consistency you need. Natural light is preferred, but even strong, consistent artificial light is acceptable. This way, you’ll provide yourself with the best chances to assess the colors and the saturation accurately and notice any imperfections in the paint and decide appropriately.
Selecting the Right Colors
Choosing a color palette is crucial in the painting pouring technique. It shapes the mood or energy of the painting as a whole, so the colours you go for are very important. The tips on how to select the right colors, or how to use the cool colors and different tints of blue to enhance the experience of acrylic pouring are the ones that follow in this section.
How to Choose a Colour Palette
To achieve a visually balanced colour palette, you will need to plan some of its aspects to ensure it is appealing. Here are some tips to guide you:
Seek contrast and balance: Fusing bright and complementary colours is crucial. This tends to create interest in the piece and eliminates the overuse of one colour in the artwork.
The mood matters: Consider the feeling or emotion you would like to express in your piece. Cool colors like red or yellow give a feeling of energy while calming colors like blue or green promote a sense of tranquility.
Go experimental with Neutral: Neutral colours can be quite useful, so do not underestimate their importance. Colour palettes can be enhanced with black, gray, and white devolving more dimension to the work.
Cool colors, such as deep blues, earth greens, and tangerines, can bring an earthy yet enchanted vibe to your paintings. Consider the following tips when incorporating cool colors: Incorporating Gratifying Colors While Incorporating Calm Colors: The use of gratifying colors for example lighter hues can mix well with earthy tones to bring a refreshing dash to your paintings. This helps ensure that the overall aesthetic of the painting is pleasing to the eye. Create blues for creativeness: Morphing different tones of blue in your paintings can help add a sense of detail to your work. Using darker shades or varying hues of blue can help create contrast and the desired effect you seek. If your main goal or aim is to bring forth a nature centered painting, then soothing and smoother shades are an excellent way to go about it. You can transition from using darker and muted forest greens to softer citrus greens, Try and experiment with new pallets and colors I’ve Multiplying Perfection, with Greater Hues This shad cannot be; a time-shift cannot afford to miss out on the countless painting possibilities provided by blue ‘For it is a world, it surely offers more than its enough’. Moore is Right To Depict “The Deep Colour Blue” When Sea Wonders In Our Deep Oceans And Combination of navies frame well among warm sequins and embellishments. This is perfect for water themed paintings.
In this piece we will discuss: Different Uses of Acrylic Paint-
Sky and Serenity with Light Blues: Whenever you like to depict a perfect sky in your painting, light blue is a preferred option. It has the ability to balance and soothe the painting. However, do not forget to play with various shades of blue and pick the hue that best depicts what a clear sunny day would paint.
Contrast with Turquoise and Teal: For a lively and eye-catching hue, complement your artwork with turquoise or teal. These colors would help propel the overall makeup of your picture.
Trying Different Amounts of Acrylic Paint
How much acrylic paint you pour into a cup would greatly determine the result in your creative piece. Now how many acrylic paints you pour is also a great deal as it will lead you to a certain effect.
Pour Cup Full of Acrylic Putpour: To achieve a more contrasting and slightly deep end effect, mix in a generous amount of paint in the pour cup. This is a great way to achieve an overwhelming and vivid set of compositions.
Pour Cup Less Pour of Acrylic Putpour: However, to produce more subtle and angelic visuals, mixing a small amount of paint will work wonders. It would help produce intricate and delicate visuals.
Layering for Dimension: Do not be afraid to mix up and play around different layering of amounts of paint, as this would help introduce dimension and depth to your art piece while also elevating complexity of the painting.
Step-by-Step Guide to Pouring Paint Pours Perfect Techniques
This section emphasizes that knowing the pouring process is quite important for those venturing into pouring art. In this section, we will discuss basic technique on how to do a basic pour. Our topics will include the use of a pseudo spout for more control while pouring, creating cells using a kitchen baster and controlling the raging paint.
Everything about the Pouring Process
Getting Ready for the Pour: Your painting space should be free from clutter, bright and have enough ventilation. For easy clean up, use baking paper on the horizontal surface where your canvas will be painted.
Mixing The Paint: Take the colors you want and then pour some mixing medium inside the paint to ensure the correct thickness is achieved but remember too much mixing will spoil the paint. Consistency is essential during the pour to get the right flow.
Pour Cup Placement: Use mixing pouring containers for your paints and layer them in the order of mixing cups. Try other colors and other sized mixing pouring containers in order to get a better mixed cup. This is where creativity starts flowing.
Make Pseudo Spouts: To make it easier to control the paint flow on the canvas, start by making small cuts on the edge of your pouring cup. It will let you control the paint flow better while you are pouring.
Pouring: Restrict a controlled amount of paint into a pseudo spout while keeping it above the canvas. Using various directions, start pouring the paint in order to achieve a desired composition on the canvas.
Tilt and Move: Shift the canvas in various directions in order to paint the corners of the entire canvas. Also twist and turn the canvas to assist the movement of the paint and create unique patterns.
Leave It to Dry: Leave your painting to dry when it reaches an acceptable composition and is close to its finished product. Depending on how thick or thin the paint is, the drying duration can be a few hours to a day.
Methods to Make Cells
Cell Creation Additives: Cells can be formed by adding additional substances such as silicone oil or a hair pick into your paint mixture. These additional substances cause a disruption to the surface tension of the paint which results in cells forming.
Torcing For Cells Enrichment: Pour the paint onto the canvas first then use a torch or a heat gun to lightly heat the surface of the painting. It helps in enhancing cells and removing the air bubbles.
Employing a Kitchen Baster
Controlled Application: A kitchen baster can be a useful piece of equipment for precise applications of paint. Use it as one would a pen; target areas of the canvas and add more intricate patterns to the composition as a whole.
Creating Depth and Texture: Try applying paint with the kitchen brush on top of other already applied layers to add further depth and texture to your artwork. With this technique there is also room for closely monitoring the application of various colors.
Making Excess Paint Manageable
Scrape Off Excess: If you end up pouring a little extra paint than necessary, take a palette knife or a spatula and scrape off the excess. This way the colors do not turn into one mush and the composition remains undamaged.
Save Excess for Future Projects: Excess paint does not have to be thrown away. Keep them and use them in other projects, or save them up for special occasions. The remaining paint can be kept in leak resistant containers, and sorted according to color or theme for future usage.
The completely new approach towards the cell formation has become easier with the art of fluid dynamics. Understanding the mechanics behind the formation of cells gives an artist enough science to bring forth patterns and textures. In this section, we will venture deeper into the mechanics of cell formation and even how filters are used for consistent and reproducible outcomes.
Mechanics of Cell Formation
Tension and Density Variations: Surface tension emerges as a critical determinant in regard to how the colors interacts and spreads with pouring surfaces, While cells tend to appear due to the color density variation.
Additions and Their Effect: Additions such as a hair pick or silicone oil aid in breaking the surface tension of the paint. With the broken surface, a cell will form due to the lower mass paint being ‘forced’ out of paint layers by the higher mass ones.
Temperature and Viscosity: Additionally, the formation of a cell can be affected by temperature and paint viscosity. The more the temperature and the paint viscosity drops, the further the movement of less dense paint will result in a higher chance of a cell forming.
Applying Filters Again To Achieve Consistency in Results
For What Purpose Filters are Used: The filters are a moyen achieving better control and consistency in the cell patterns formed. Artists are able to control the amount of paint poured and put up a shield that controls the movement of the colors, resulting in well-defined cell structures.
How To Choose The Right Filters: Practice different types of filter such as nylon mesh or a coffee filter and see how it affects the cell structures. The size of the mesh and the type of material will affect the size and even the shape of the cells, this give a broad spectrum of choices.
Positioning on the Canvas: Filters should be positioned strategically at the canvas to guide the pouring of the paint. The filter can create borders enabling some colors to go through and some not allowing for a controlled and attractive cell formation type of patterns.
Playing with Sizes of the Paint Containers
Changes in cell patterns can also be achieved by changing the sizes of the paint containers. The type of container used to pour paint over the canvas will determine how the other colors will mix and flow hence adding to the cells.
Large Cups for Dynamic Cells Patterns : The volume of paint in a larger cup results in intermingling and creating larger cells which creates a bolder look.531
Small Cups for Detail Oriented Cells: Pouring paint from smaller holders tends to create complex and cell-like patterns with a more appealing but nuanced fine touch as only a limited amount of paint was poured from the cup.
Layering And Sequential Pouring: Use varying sizes of cups in a layered approach by pouring paint in a sequential manner which will then intersect with one another , this would create a multidimensional cell array.
Advanced Tips and Tricks
Base coating and innovatively using wax-like paper to add dimension and layers to your painting will be tackled in this segment that goes above and beyond the conventional painting techniques you might be accustomed to.
Depth Building with a Undercoat
Purpose of an Undercoat: The application of an under coat acts as a base for your pour painting by making an underlayer that goes well with the layers that would be applied later on. This technique works well as a way to add layers and enhance your work more.
Choosing the Right Colors: Base coat should always be used that would be slightly off and the colors being used in the pour should always work perfectly, the reason is simple once the painting is done the poured layers will slightly cover the base layer which would add further beauty to the painting at hand.
How to Apply: Evenly layer the paint across the canvas with a brush or painter’s knife, consider trying stippling, cross hatching and other techniques to add texture during this stage, Experimenting can come greatly in handy at times During the painting process.
Pouring on top of the Base Coat: Once the base coat is dry than the normal process for pouring can commence, The art work looks even better when the pour layers are interating with the base coat that was previously poured, the combination of both instills even more beauty into layer.
Injecting Scent with the Use of Wax-Like Paper
Innovative Texture Medium: Wax-like paper, with its distinct blend of softness and roughness, is an impressive aid to have in your paint-pour kit. With this method, you will be able to add texture details to particular parts of your work.
Application Process: First, some pieces of wax-like paper are placed on the canvas and paint pouring is done. The aim here is to make different kinds of textures so the paper can be scrunched up, folded or placed into any combination. The paint, which flows over the paper and then through it to aid it in a stencil fashion, adheres to the surface of the canvas.
Experimenting with Layers: Adding and mixing different depth levels of wax-like paper above one another with putty enables the user to smoothen out the textures. This technique makes it possible for you to add intricate details to your art work’s exterior and other complex patterns within your painting.
Additional Work on Paintings
Upgrading your pour paintings will require you to prepare for extra work apart from the initial puring, however these added efforts will go a long way towards boosting the entire visual effect of your art.
Post-Pour Adjustments: When the paint settles after it has been initially poured and dried, identify the composition. Minor changes or any needed manipulations can be made with a palette knife or some brushes to improve the shapes, add more depth or contrast and make changes to meet the aesthetic goals of the painting.
Collaging Ideas with Other Artistic Approaches Collaging Ideas with Other Artistic Approaches: For example, Three-dimensional collages or canvases that have been painted internationally. Consider mixed media added to the diffusion technique and everything as a whole.
Continue Applying Individual Elements: Attempt to apply third and fourth layers of poured paint into specific regions of the already painted surface so that the effect is more pronounced. The resulting concoction seems lovely and rich and is quite impressive at the destination because of these tremendous visually stunning final artworks.
Miscellaneous Elements: The third layer of collage that has already been covered four times is stocked, pasted, and put together. The process of applying cellophane to the canvas which has been flipped upside down is also included;. Enclosed are some of the artworks that take a collage approach.
Pouring Mediums Interaction Pouring Mediums Interaction: The interactions with pouring mediums foster the broadest diversity of paintings. Since the mediums influence shift, the flavor of the painting changes. There is an intricate textual effect or a thick, dense look in the painting.
Stand Oil for Shine: Add stand oil to your paint mix for a shine. It’s a slow drying linseed oil that can give your paint a sheen. This medium also helps control color blending movement as it extends the drying time.
Gesso for Surface Variation: Gesso is an effective surface preparation material that adds tooth or texture to the surface of the paint mixture. This is useful in achieving a more tactile or layered effect in the artwork. Use other proportions to discover what is just perfect.
Mixing Pouring Mediums: Do not be afraid to mix pouring mediums to discover their synergy. You can make some stand oil gesso and gesso to discover gessa. It combines creativity and unity while building forms.
Adding glitter or glitter to make an Uniquely Dense Appearance
Using Glitter to Enhance the Look of the Paintings: By using fearlessly glitter, you give your paintings a glitzy touch and sparkle. Let your color palette dictate the glitter colors and sizes you use. Alternatively, you can sprinkle the glitter into the paint rather than pouring it over the top.
In addition to glitter, you can combine other additives to your pour painting. Additives such as crushed glass, sand or small pebbles add density and texture to your artwork. This indeed creates a distinctive and visually pleasing surface.Create Density with Techniques for Exciting Add-ons Adding metallic pigments or powders to the paint creates a lustrous, metallic finish. This technique adds depth and sophistication especially with contrasts between some metallics and matte colours in the pour. You may also like A Step by step approach in Pouring Acrylics and Epoxy without Wasting them. Achieving a Balance While experimenting with additives, it is crucial to maintain the balance which supports the entire work. Read also Liquid Acrylic Painting – Step by Step Guide To Do Pouring Art and Techniques. Avoid drowning the painting in the glitter and other additives, rather reserve them for strategic points of the painting or particular aspects of the art if not necessary. Sealing and Protecting In case of your pour painting has already been done and is dry and ready, use some relevant varnish or clear coat to cover it to ensure the additional elements are protected and the longevity of the artwork is sustained. Solving Problems and Issues A great number of artists are used to experiencing problems in the steps of paint pouring. Quickly resolving these issues with the help of prompt and valuable solutions largely optimizes and improves the painting experience.
Bad Batches of Paint
Identification: Identifying a paint defect is extremely important especially when the paint is clumpy, inconsistent or the colors don’t blend appropriately.
Solution: The paint in question should be discarded and instead remixed with a fresh batch. Consider adjusting the ratios for better blending before another attempt.
Inconsistent Paint Texture
Identification: Inconsistency in paint texture can lead to other paint variances such as an uneven flow or odd looking patterns.
Solution: To attain smoother consistency, a pouring medium or water may be added to thin it out. The paint also needs to be well mixed to avoid lumping.
Troubleshooting Guide for Dealing with Certain Batches
Certain batches of paint can prove to be problematic Therefore, these specific issues can be handled by targeted troubleshooting carefully targeting each problem.
Identifying issues: Find out the possible problems with the batch. Such as: why is the paint taking too long to dry, why isn’t it sticking and why does it appear bland.
Tailored solutions: Once the target problems are known, the possible solutions to those problems are wise changing the duration of drying time or perhaps changing the pouring medium or the paint color used ensures more vibrance.
Testing small Samples: It is often prudent to paint a small sample of the artwork to observe how well the paint adheres and works with the surface allowing to pinpoint and overcome any refinements needed before commencing the full artwork.
Consulting Experts: If issues persist, consulting accomplished painters or looking through art forum may help. They may provide useful insights and recommendations based on the painters own experience.
Cups of Different Dimensions
Question: Do the size of the pour cup affect the pour?
Response: Ah, there is a general consensus that larger cups will allow for a wider and bolder pour, while smaller cups will allow for finer pours. You should try different sizes to see what they do to your final piece.
The Use of A Painting Journal
Question: It is important for one to maintain a painting journal?
Response: Well painting journal allows one to keep documents of color combinations used, pouring techniques employed and the outcomes of all the above might be. This will come in handy in the future whenever a specific project is being worked on or mastered in a process.
Final Observations
In the process of trying to perfected the pouring technique using acrylic, the final touch and mark is put through an endless combination of trial, and perseverance. Here is a summary of the most important points to remember;
Trial and Error with Different Dimensions of the Cups Used: Different combinations of cup sizes could be used to achieve different pours allowing the artist to try and bring the desired picture to life.
Summary of the Techniques: This guide opened up many techniques to extend one’s artistic expression that ranges from creating cells in the painting to enhancing the depth by putting a base coat and any other unique elements to the artwork.
Encouragement to Engage New Thoughts: Talent, in particular, is instructed not to adhere rigidly to the accepted conventions of painting but to experiment instead and break the mold.
When you step into the cosmos of paint pouring and liquid painting, never forget that every splash is an artistic expression. Welcome the chaos, appreciate how every piece is different, and let your inventive juices run wild. The fabric is the playground, and the colors are the means of creating a stunning masterpiece.
References
Here are some references for both chronic and liquid touches teaching:
Books:
Art of Paint Pouring by van ever amanda
Fluid Art Mastery: 8 Steps to Being a Paint Pouring Artist by Rick Cheadle
Online Tutorials:
The channel of youtube called ‘Acrylic Pouring’ is one of the sites that offer tutorials and demonstrations of the activity.
Art Supply Stores:
Online stores such as Blick Art Materials and Jerry’s Artarama also sell the different supplies used in acrylic pouring.
In this way, you can further your artistic endeavor, improve your artistry and gain inspiration from using acrylic pouring techniques. Happy pouring!