Sketching, like every other drawing or painting, isn’t just a mechanical task of drawing things. It has much more to offer. Art, imagination and skills are some of the attributes sketching helps build. Sketching is an integral aspect of an artist’s cycle and a sketch can be defined as a foundation of any art or creation. Sketching can be done for a wide variety of ideas from being an emotional photograph to engineering, it is the basis of all.
For someone who is new, the journey to becoming an ideal artist can be complex. In such a case detailed instruction proves to be very useful. Well, without constant tutoring, students can sometimes struggle to focus or be disappointed as they don’t have one or strong enough starting point. As such it is important to have a simple but complete plan to foster their zeal and skills.
There is a nice and a sincere feeling that every young and budding artist possesses: an eagerness and passion, along with creativity. They have the vast amount of true insanity and potential that is required to start their creativity. They however need specific sort of direction according to their trend. In fact, these sorts of methods can help them in becoming highly passionate which will also lead them towards creativity.
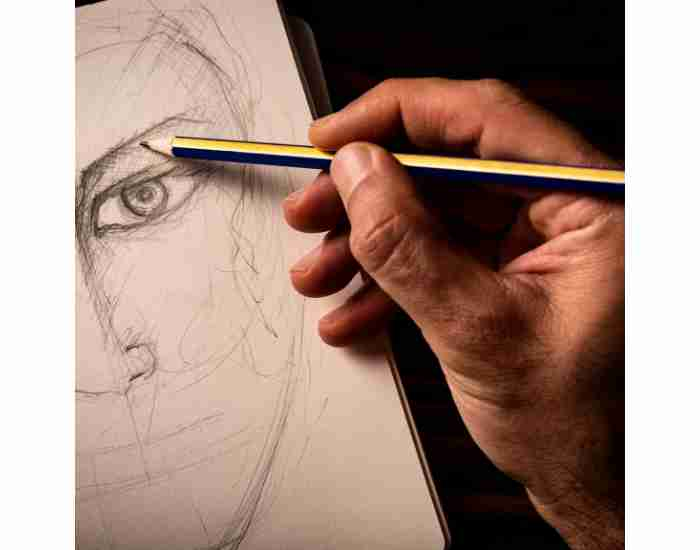
In this case, we shall explore the area of sketching by providing appropriate stepwise instructions to young budding artists. Such a person can be totally new to sketching or has done it a few times before but he or she has not really grasped the element of art. All of you are invited therefore to prepare your pencils and sketchbooks and let us go on this creative journey together!
Sketching Basics
Sketching has become such a vital aspect of creating art as it encompasses the more detailed forms that are painting, illustrations or simply visual imagery. It is one of those things that a lot of artists started as a foundation to becoming great, and it is also something they continued doing as they progressed in their journeys. It more often than not serves as a way to express one’s thoughts in the form of images without depicting the final form of art.
The Important Role that Sketching has in Art
In the world of art, sketching has a vital role. It is something that can allow a person to create and express themselves more freely. The idea to be able to explore the things in a more modified concept without worrying about it being a finished piece is where the beauty of sketching lies. It is beneficial in being able to connect the thoughts and images in the brain eye, which the artist uses to solve problems and create a vision.
On the other hand, sketching can help an idea flow into reality. An artist can tap into so many of their wild ideas and thoughts when they begin to let loose and create. And with creation, they can explore little imperfections and all the complexed detailing an art piece can have. All of this combined allows an artist to find their niche, or their definitive style in the art world.
Necessary EXTRAS to aid Sketching
An outline improves the clarity of an image and in order for one to start working on a sketch, one has to have some starter components which are;
- Pencils: The most basic tool that is required for sketching, the pencil comes in different sizes and qualities in order to create different textures and line styles. A range of pencils, from soft (e.g., 2B) to hard (e.g., 4H), to accommodate different sketching techniques and styles may be required.
- Paper: The paper a sketch will be done on is vital in determining the quality of the sketches since different papers have different characteristics, it especially helps to avoid smudges and bleeding. Pick agood quality sketch book or a collection of sheets that are smooth have the right weight (0.1–0.12 grams) and thickness to minimize bleeding and ensure good quality of the image being drawn.
- Eraser: An eraser not only is used to make changes but also to clear and touch up some areas of the sketch. It is best to opt for a kneaded or soft eraser which is best for removing the light strokes of a pencil and is not harsh on the paper.
- Sketchbook: Having a sketchbook gives an artist a focused area to start working on the different aspects and sizes of the sketches and over time improve and try out different approaches. The best option is to get a sketch book that is tightly bound and has acid resistant sheets in order to make sure the quality of the drawing doesn’t deplete or fade away.
Observation and Practice in Sketching
When it comes to sketching, the skills of observation must be deployed first in order to comprehend how to capture various forms. Thanks to careful observation of things, the forms of forms, light, shadow, texture, and nuances of the environment can all be translated into an artist’s sketch, reinforcing his or her work by adding realism and depth to the painting.
However, honing sketching skills also calls for practice. Like any other skill, sketching requires effort and practice on a regular basis to achieve some level of competence and artistic flow. Regular practice enables artists to practice their hand-eye coordination, views of forms and proportions, as well as their unique artistic style.
The Role of Pencils and Paper
Pencils and paper are the most common materials used in any sketching activity. It is important to know the type of tools to use considering that they will affect the outcome of the sketches. Let’s cross over to pencils and paper where many potential artists will have many choices to pursue.
Selecting Appropriate Types of Paper and Pencils
Pencils:
- Graphite Pencils: Among the types of pencils used for sketching, graphite is the most preferred. Graphite pencils come in a variety of degrees of hardness and softness and so, can be used diversely. The grades of pencils range from 9H being the hardest and 9B being the softest. Drawing detailed designs in a drawing or sketch can be achieved whilst using hard pencils, examples include 2H or 4H. On the other hand, if one is interested in drawing dark shades and textures, then they can use soft pencils such as two B or four B.
- Charcoal Pencils: Charcoal pencils have become the artist’s favorite due to the bold and dramatic sketches charcoal can draw. Besides being used to make velvety sketches, charcoal pencils come in different degrees of hardness thus allowing the sketch artist to use many different levels of intensity in their drawings.
- Colored Pencils: With the use of colored pencils while sketching one is able to be very creative as you will not be limited as there are many colors, tones, and shades to choose from. When sketching illustrations such as portraits definitely colored pencils are the best to use as they add color and detail to the sketches.
Different types of drawing paper:
First of all, sketching paper is quite rough but has high-density textures that help in maintaining integrity in strokes from ink and graphite, so viewers can appreciate the art without distortion. Some sketching paper with a weight of 100-120 g/m2 with high density is ideal for sketching since it comes in different weights and is tailored to graphite and ink strokes.
Moving forward, drawing paper has certain advantages compared to sketching paper since it is rolled and thus provides a grainy surface for charcoal and graphite painting while still managing to be thicker and textured. Thus one can use charcoal and graphite without troubles and use it for quick sketches.
On the other hand, one can utilize mixed media paper as it is ideal for those who enjoy multiple other tactics and materials along with, foreshadowing the use of pencil strokes, watercolors and pastels.
Tips on how to choose the right pencil hardness and paper texture Advancement of the art is mainly decided by the sketching and for a more detailed and intricate drawing, a hard pencil along with a smooth paper lacking any texture would definitely help. On the other hand, for an expressive sketch stick to rough pencils with softer strokes along with textured paper.
Experiment with Different Combinations: Don’t hesitate to mix matches with paper and various pencils to achieve results that you want. For instance, you can put soft pencils with coarse paper for more active or expressive sketches, or smooth paper and hard pencils for more sophisticated and detailed illustrations.
Think About the Desired Effect: What do you have in mind when sketching? What kind of emotions or sentiment do you want to communicate? Soft pencils along with images of textured paper can offer a more ‘natural’ feel. Mesmeric and hard precise lines in the draw can be achieved if one uses a hard pencil and a smooth paper texture.
Digital Art Tools and Software: Various digital art tools as well as software enables an artist who wishes to sketch digitally to do so in style. Digital sketched can be used with many combinations of chalks, paints, and colors on a reasonable basis. Some well-known software are Adobe Photoshop, Corel painter and Procreate.
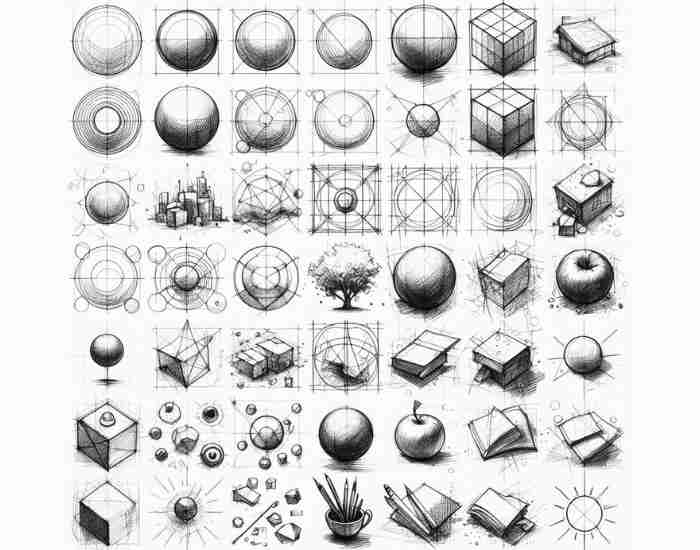
The Process of Learning Basic Shapes Starting Points
Shapes are the key elements in every drawing, helping to shape the final piece of artwork. So, the artists need to acquire enough skills in drawing the primary forms like triangles, squares, or circles. In this segment, I will explain how to sketch basic shapes, then follow every steps for every task along with practical activities to turn those basic shapes into finished products.
The concept of the Basic Shapes
Before improving detailed sketches, It’s important to note why basic shapes are so fundamental in the process of sketching. It’s simple, basic shapes are the starting point of any sketch as it will help you build structure or form of your drawing. To put it simply, the use of geometric shape or putting together simpler shapes will make it easier to depict the object from a single perspective or angle.
Common Shapes That Are Easiest To Sketch For Beginners Step by Step
Circles:
Begin by making a contour on a paper using a light pencil to draw a circle.
Using short strokes and with confidence, try to outline the circle shape adjusting the size of the lines accordingly.
Once all unnecessary and rough guidelines have been erased, the unfinished circular outline can now be defined for uniformity.
Squares:
First, start drawing a square by connecting straight lines, making sure each line is of equal size.
Join the tips or endpoints of the two lines in such a way that the corners are formed accurately and every angle created is equal to ninety degrees.
Without losing detail begin to rectify the angles or the proportions and the symmetry of the square through the use of several faint strokes until you get the desired square.
Triangles:
Mark a straight line which acts as the base of the triangle
Using the endpoints of the base, draw two straight lines that go up at an angle towards a particular point where they become the sides of the triangle.
Once you have the triangle begin refining its shape until you are satisfied with the fact that all sides and angles are straight and even.
Practical Exercises to Master Shape Drawing
- Shape Replication: Pick up the nearest of the simple rounds objects such as fruits, simple household items or geometric shapes, and try to capture their essence thoroughly by sketching their simpler shape outlines without losing proportions or dignity.
- Shape Variation: Use different orientations and placements of the basic shapes to come up with alternatives like when using the circle and the square to come up with more.
- Shape Manipulation: Draw the outlines of one or more basic shapes and include details to come up with one or more identifiable objects, start from simple objects like the ball for which you would need the outline of the circle or the box which would be the outline of the square and the pyramid which would need the outline of the triangle and repeat the process for more complex objects.
Getting Started With Drawing 3D Objects
Let us assume you are good at sketching and have already mastered drawing some shapes. shapes such as squares, circles, triangles, and rectangles. Do you wish to take your sketches to the next level by drawing them as objects? With basic shapes, for example, combining a circle with a square and some manipulations, you may sketch more advanced shapes that resemble more complex forms in the world. If this is your goal, let us guide you in a step-by-step manner how to get there through examples and by encouraging you to try out different things on your own.
Guide for Combining Different Basic Shapes
Step 1: Choose An Object
Pick a common item that you are fully aware of, such as a chair, mug or a tree.
Step 2: Establish Basic Shapes
Analyze the object and categorize it into primary geometric shapes like circles, squares, rectangles and triangles.
Step 3: Intertwine Shapes
Demonstrate the fundamental aspects of the form by drawing the majority of the shapes and linking and blending them together.
Step 4: Final Touches
Draw the textures, shading, and detail of the drawing to give it some depth. Ensure that you consider angles, proportions and perspective while sketching the object, this will make the drawing appear more realistic.
Providing Examples of Everyday Objects
Mug: A mug can be constructed as a hollow cylinder, with a hollow circle on the top and a hollow rectangle attached to it on the side.
Chair: A chair may be defined as a combination of a rectangular shape for the (seat and back rest), square shapes for (the legs) and circular shapes for (armrest).
Tree: A triangle is the basic form for its trunk and circles represents the foliage, other aspects such as branches and textures are also added to make it realistic.
Encouraging Experimentation and Creative Interpretation
- Think Outside the Box: You don’t have to draw representations in the typical way. There are abstract shapes, as well as odd forms and unusual composition, and different ways to represent an idea, use them to add more imagination and uniqueness to your drawings.
- Embrace Mistakes: Mistakes are part of being an artist and actually being an artist is more about making mistakes than following through with techniques, which the artist is expected to apply, then ignoring flaws can also be helpful since it allows the artist to learn.
- Seek Inspiration: It can be gained from one’s surrounding, whether flowers or buildings, or even a post by the roadside. Pay attention to various forms, consistencies, and structures around you and use them in your drawing.
Exploring Lines and Techniques
Lines are important in every sketch as they determine form, outlines, and texture. It is the nature of outlines that influences the mood of the sketch, its stylistic approach and visuals too. Let’s take a closer look at the need for line quality and use of various line techniques in your sketches.
Importance of Line Quality and Variation
A line is more than a stroke on the paper; it serves as an emotion, movement, and depth representation. The quality of lines in sketches which include their thickness, pressure, and density are all important as they convey different feelings in the viewer.
- Thickness: Thick lines are a sign of boldness, strength, and focus, and this is the opposite of thin lines which show fragility and a hint of subtlety.
- Pressure: By controlling how much pressure you place on the pencil, you can create lines of varying appearance, including visuals with more depth and lines that have more texture, which adds more character to the sketch in general.
- Consistency: In order to convey safety and confidence in the artist, consistent lines are used. On the contrary, rough and zigzag lines are used to demonstrate energy and movement in the painting.
Line Techniques
Hatching
Hatching comprehensively includes using a series of different parallel strokes/lines in order to illustrate dynamism in a figure while allowing more detail. Changing the distance and the probabilistically shaped lines could help achieve different emphases that were intended.
Cross-Hatching
Cross-hatching Helps in more detailed images by drawing the light reflecting off one surface after it has passed through another at multiple radial angles. Decreasing or increasing the density and the random angles while being interlaced helps create shadow, color blocking, and more.
Stippling:
Stippling is a mechanism which uses a series of small dots or touches, around, to create a mark that depicts value, texture and form. The finer the dots in a painting the smoother the gradient, vice versa, the thicker the dots the more texture there will be.
Offering Exercises to Develop Line Control and Expression
- Line Weight Exercise: Do a practice session by drawing straight lines of varying thickness, but ensure to vary the pressure and thickness throughout the process. Use light, medium, and heavy pressure while sketching to varying degrees.
- Hatching Practice: Try sketching a few simple forms and shapes and progressively move to more complex forms using only hatching techniques for shading. Set realistic goals that will require you to practice your skills and stimulate your creativity.
- Cross-Hatching Study: To create textures like fabrics, wood or metal, try cross-hatching. A critical note I must emphasize is remember to look for patterns of light and shadow that will be the foundation for the cross-hatching.
Shading and Textures
Shading in drawing is a vital constituent since it enhances the depth, dimension as well as realism of drawings. Mastering and employing shading techniques and textures are essential to aspiring artists that wish to enhance the quality of their sketches. Therefore, let us understand the role that shading plays in a drawing and further, focus on various shading techniques and how to create textures that look real in illustrations.
Arguing Portrait Sketches Without Shading Is Impossible:… How come?
First and foremost, shading is more than just dabbing the exhibited drawing, it is about using color to depict form, volume, space and light in a more realistic approach. Analyzing the prominent light sources and comprehending how the light emanating from them interacts with objects can make an artist incorporate shading in a more effective manner into their sketches.
- Depth: Shading doesn’t just create the understatement of an object, rather, it pulls the various objects into a three-dimensional position which makes them appear realistic.
- Volume: An artist may alter shading by increasing or decreasing volume, along with rotating it; Doing so may create solidity and free forms in a drawing.
- Atmosphere: Dramatic or soft, Shading enables the transfer of mood and atmosphere across several layers in a drawing.
Showcasing Different Shading Techniques
Blending:
Blending is the technique used to blend a transition from light into shadow or from shadow to light using a blend of both charcoal and layer. It is important to note that there are artists that smudge graphite or charcoal in an effort to achieve soft gradients that blend well into one another.
Stippling:
Stippling is the practice of creating dots or small marks into a source portraying the value and texture around and in it. By changing the size, density and the distance the dots fall within each other, a range of shading patterns can be achieved; from gradients to full textured images being possible.
Cross-Hatching:
Cross Hatching is used to create texture and depth to sketchings with either intersecting lines placed at angles or bright lines placed underneath them. Depending upon the angles formed and changing the number of strokes used, shadows, highlights or even textured areas can be drawn on the desired work.
Giving Advice on How To Draw Realistic Textures
- Fur: The direction of the furry coat must be maintained. Use short, crossing strokes or overlapping dots to showcase the fluffiness. Different lengths along with a different density of strokes can be used to create movement along with mass.
- Wood: Parallel lines can be utilized to depict wood texture in a sketch. To create patterns such as coarse wood or a fine texture, try adjusting the distance and width of wood patterned lines.
- Fabric: When reproducing fabric textures, note the seam lines, creases, and the garment’s droop and apply cross-hatch or stipple shading to its surface and form. Always consider the source of light, which can be the sun, and where shadows and highlights should be placed.
Life Drawing and Drawing from Imagination
Both life drawing and drawing from imagination have their own advantages and provide numerous learning opportunities as an artist. It does not matter if you are making a direct observation or imagining it in your brain, each effort can be beneficial in paving way towards development of one’s artistic skills and creativity. Let us look at the advantages of life and imaginary sketching along with drawing gestures, expressions and movements in your sketches and how Photoshop painting can help towards this in expanding your creativity.
Talking about Sketching by Observing People and Things around Us and Sketching Imagination
Observation:
- Apprehending Shape: Working from life makes it possible to sketch real objects, the surrounding persons, and places giving you a chance to gain more knowledge of form, proportions, and even perspective.
- Sharpening Observation: By staring closely at little items, minute details, and even the minute changes in the environment, you are better placed to sharpen your observation skills and train your eye to perceive objects more clearly and thoroughly.
As an Artist, there is nothing more engaging and intriguing than to explore a real world in its 3D form as nothing can compare to raw life in 3D, Sketching from life is a great way to catch the essence of your subject by giving great energy and authenticity to the movement in your sketches making them lively and realistic. Allowing you in return to sketch a never seen before reality that is a one of a kind approach. Everyone wants their ideas and imagination to run wild and that is exactly why sketching from imagination allows you to create vast landscapes, tornados of characters and unimaginable concepts as you set no limits for your mind. For those who are obsessed about dreams, visions, and unique ideas sketching in that regard seems like a good option as that is the only form of art that lets you convey your thought process and voice. Moreover, lets you stress test your skills by imagining realism. Often times the real world and visions hold a plethora of artistic techniques and when it comes to sketching movement and gestures, it certainly does get easier in simply observing those who have greater facial and body expressions. Sketching life in that scenario gives a good sense of motion and animated appeal. How to draw and embody such motion in an illustration is through practiced perseverance and muscle memory wherein you quickly sketch out the key points through lite strokes that emote dynamic movement of the subject in this case. Repetition is key in art so be sure to engage in such movement oriented sketches regularly. Focus on improving cadence that your sketch flows in as well, that makes the sketch as smooth as fluids. Diversity is the solution as sketching is limitless and with that mindset, be sure to differ on the details.
Use Gesture and Line: Utilize your lines as gestures to express the mood, emotion, or feeling of the image to highlight its general impression instead of the specific one.
Movements:
Capture Dynamic Poses: Finding the intricate movements be it a person’s walk, dance, or sport, look around as something interesting is brewing in your surroundings.
Convey Action: Quick but slender lines and action-oriented compositions enable you to sketch the movement there and then to give the moment the energy it deserves.
Mentioning Digital Painting and its Creative Possibilities
A digital painting is one of the widest horizons a painter can look to without being restricted to the default color combinations of photoshop as it allows the combination of different colors and textures. Whether an artist is traditional or one who embraces technology, digitally painting is one of the best techniques to evolve oneself into a new level of creativity and exploration.
- Endless Options: Not only for you as a creative being but also for your work, the unlimited number of painting styles and effects help you get more options when installing for adobe, corel, or Procreate.
- Transferable Editing: Altering your sensitive painting would be a risk if one was to opt for the new idea but now with digital painting, one can work around the idea without thinking of the consequences.
- Flexibility and Versatility: Digital canvas offers a revolutionary approach as it allows the user to work literally with endless layering options, color schemes and makes it easier for them to make changes on any type of work at any stage of its creation.
Advice on sketching figures, faces and portraits
There are numerous factors that come into consideration while sketching figures or portraits such as detail, practice and knowledge of body structure and Alos expression that needs to be mastered. People who are novices or skilled can put all of these portrait or figure sketching methods into practice and become more precise.
Procedural guide for sketching figures and portraits
Step1: Initiate with Geometric figures.
Commence by sketching geometric outlines of the body or head, for example, a circle for head, an oval for trunk and cylinders for hands and legs.
Make use of vague strokes to create the general approximation of the size and pose of the person in the portrait/sketch.
Step 2 designate the features
Once you have the basic shapes in place, start adding details to deracinate the exact sketch of the face with its features like nose, mouth, ears, and even the eyes. selected
Step 3: Enhance Features
Enhancing features how parts of the face and body are more realistic by applying shade, texture, depth and other details to them.
An individual varies from others by their characteristics or personality, which can either be their particular face or body movement.
Step 4: Create Shadows and Highlights.
Portrait and figure shadows are created as dark shades using blending, hatching, cross hatching and other relevant techniques.
It is possible to establish volume and perspective by considering the center and structure of the body and the face as well as how and where the light shines. It is important to understand the concept of the images we want to create and the volume we intend to use.
Step 5: Polish Lightly and Add Fine Details
Portrayal sketch creation involves accurately sketching parts in relation to the body as well as the features and the final image and making alterations where necessary.
In as much as the image has been formed, for it to appear more lifelike, particular touches like hair, clothes, and other accessory pieces should be added.
Talking about the importance of knowing face features and anatomy in portraits drawing.
Portraits are meant to communicate feelings, hence the portrait must be expressive and realistic which is entirely impossible without understanding face structures and characteristics. Artists must understand the proportions of the face as well as the depth of face features in relation to the underlying muscles and facial bone structures.
- Proportions: It is important to note the proportions of the face looking at the distance between the eyes, the size of the nose in relation to the mouth and the shape of the jaw line. These proportions differ from one person to another and they could greatly influence the resemblance of the portrait you are trying to create.
- Facial Features: Examine and analyse the facial features more than any other aspect of the face the positions of the eyes (for instance their slant), the fullness of the lips, the prominence of the nose among many others. Being aware of the structure and fine variations of these features will enable you to create likeness and expression more efficiently.
- Expressions: A great deal of emotion, mood, and personality is conveyed through facial features and so becomes of great significance in portrait drawing, conveying each unique element concerning the portrait. In this regard observe different expressions and try to sketch them and the activations of muscles and structures with the associated tonicity.
Providing Tips for Capturing Realistic Portraits and Expressive Facial Expressions
- Observe and Practice: Look at people’s faces or photos of people’s faces and pay attention to folds, wrinkles, and even new lines. This will help you understand how to sketch different faces better.
- Make Use of Reference Photos: Reference photos help a lot in understanding certain aspects and features of the face and certain facial expressions with the help of proportions and the details of the face’s anatomy. Use different set of photographs to try drawing different faces and expressions.
FAQ – Frequently asked questions
In this part, there are several questions and answers that appear with significant frequency relating to sketching, digital art, and getting inspired, which will help you to start your artistic journey.
What Type of Pencils Do You Need as a Beginning Artist?
The most important aspect for a beginning artist is making sure he/she has enough pencils with multiple degrees of hardness. If you’re just starting out, I suggest buying a basic set of graphite pencils, from 2H to 6B. This range will allow you to create a variety of line weights and textures in your sketches. As you gain more experience, make sure to include other types of pencils such as charcoal or colored pencils to glean more from your craft.
How can I quickly advance my sketching ability?
It is well-known that it does take practice and time, but if you are looking to grow your sketching abilities, there are some things you can do. First, sketch on a daily basis or on an especially dedicated day of the week. Do not hesitate to challenge yourself with various subjects and try styles that differ from what you are comfortable with. In addition, get constructive criticism from fellow artists and learn new techniques by studying masters’ works. Last of all, do not rush the process as it does take a while, but with hard work you will improve.
Is going into digital art a good career option for young people?
Yes, there are numerous reasons why a young artist can find digital art an appealing option. For instance, it allows them to create art with great freedom and creativity as they can play around with various tools, techniques, and effects all in a single platform. On top of that, they don’t require dedicated materials or studio space which can be quite expensive, making art easy and cheap to get into. Furthermore, given how tech-centric the art world is becoming, digital art is an important skill to have for the future. Young artists can maximize the potential of their creativity in digital art by having the right software and other resources.
Where can I get inspiration for sketches?
Look around in nature, look at art, look at people, and get inspiration for my sketches by going to different places. What thoughts do you have? Jot them down in a sketchbook. In case you don’t want to focus on art, change the subject, style, techniques, or your preferred variation of creativity. Movements, Films, Music and even your personal experiences may act as an “Outside Art” that can help you draw your sketches. In short, as long as your eyes and minds are in the right place, remember, inspiration is everywhere.
What are some good software for digital paintings?
There is no shortage of software when it comes to digital paintings, there are dozens with endless options that can be used to create digital art. Some that are more popular and easier to grasp are:
Adobe Photoshop is an industry’s leading general-purpose editing tool that can be thankfully used for drawing, painting, editing android photos among other things.
Corel paint program is known for its realistic paint formats and natural editing effects as an online tool.
Procreate is the best and most recommended when it comes to a great variety of paint and simple touch-ups for pictures.
Krita is a free and open-source program that is capable for digital painting and animation.
Clip Studio Paint is an all-purpose program for manga, comics, and illustrations that comes with a considerable number of brushes and tools.
Final Thoughts
Within these contexts, we have gone through how to use a sketching book that features tips and tricks that every young artist would need to accomplish their tasks. Let’s summarize the most important points of the book and urge the young artists to strive on their artistic pursuits.
With an artist’s raw passion and innate talent, you are sure to achieve the success you seek. However, in order to fully actualise that success, you will have to practice over and over again. Sketch after sketch, remember that you are an artist at gecko, there is no wrong step. Make mistakes. Practice. Evolve.
Leave aside the self-loathing and perception of society that is the bane of every aspiring young artist, and instead appreciate the art that surrounds you. Use it as fuel to ignite your imagination. The only obstacle standing between you and becoming an artist is yourself. Don’t hold back.
Sketching is fun and easy. Being able to convey your thoughts to someone else is the real goal here, and at the end, it doesn’t matter whether it is your story, or someone else’s story or their experiences. Skechning is through and through an attempt to broaden perspective. So appeal to only one thing, the passionate love of art. Don’t lose the essence of Why began in the first place.