Drawing and implementing new textures with Linocut procedures could revolutionize your art and improvement of your creative endeavors.
You’re standing in front of a blank canvas. There’s a million opportunities ahead of you. You reach out for a paintbrush, but it just doesn’t seem right. However, with Linocut, art comes easy. Let me begin by stating how for the first time I placed a block of linoleum on paper, the feeling was fearsome in the right manner. This was an unrealised dialect of textures that appeared to be plotting, waiting to be liberated by me.
So, linocut….. what is linocut? Simply put, it is a process of carving out an image from a linoleum block and later rolling ink across its surface to produce prints. The versatility of linocut is quite advantageous since it is derived from a much older culture. As far as historians can tell, the origins of block printing served as early as the Tang Dynasty in China in the 7th century. Going into the 20th century, block printing had become popularized by Picasso and Matisse in creating texture with their paintings and linocut masqued more modern attempts.
Revisiting my Linocut experience, I recall having stepped into a quaint studio located in my area to attend the workshop for the first time. The aroma of kinks and linoleum was evident as I observed the teacher demonstrating how to go about carving. The entire process looked very complex but suddenly the time came to put the tools in my hands, and it was a spectacular feeling. There was so much room for complexity and texture and every cut into the linoleum made my vision clearer. I fell in love right then! This sparked an interest in me for print making and to this day, it has remained a key element in shaping my art.

The Basics of Linocut Techniques
Now that we have your interest, let’s look into the other facets of Linocut.
To put it simply, a linocut is a sub-branch of relief printing whereby the artist begins by cutting out portions of a linoleum block, after which they retain a raised surface that is filled with ink afterwards. By stamping this block on paper, an image is created and voila, beautiful prints are made. It’s similar to carving an image onto a plane, allowing for every mark to depict an element of a story.
In order to prepare yourself for your linocut adventure, there are a few tools in particular that you will require and that are key towards enhancing the textures you are trying to go for.
Essential Tools for Linocut
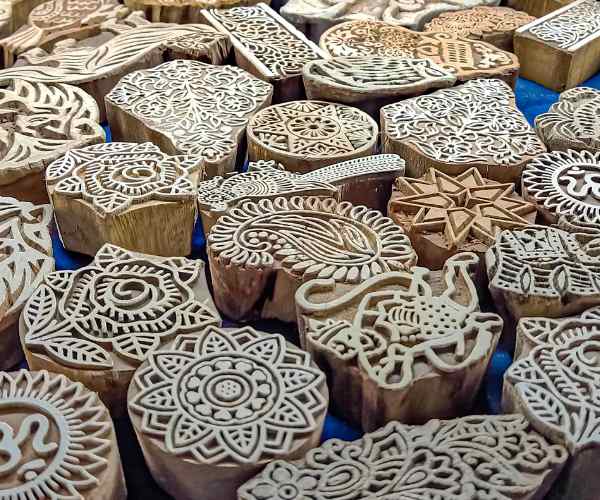
- Linoleum Blocks: These have a large role as they act as the foundation for all of your designs. They come in multiple sizes and thicknesses but serve the same role of a carving surface. A lot of newcomers opt for softer blocks as they are easier to work with.
- Carving Tools: Always ensure that you have a quality carving set in reach that contains V-shaped and U-shaped blades. These blades allow you to manipulate and create in your own ways. When properly used, these tools give you the freedom to generate everything from finer pieces to smooth broad strokes. A competitive set should always be prioritized as it improves efficiency.
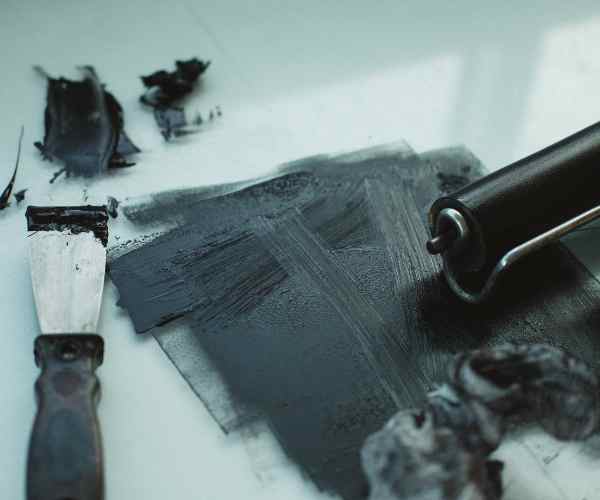
- Brayers: These are tiny rollers used for an even application of ink to the linoleum block. A good brayer tries to make sure that the desired consistency is met. This is a basic tool but works wonders in achieving the best possible results.
- Inks: Characteristically made linocut inks dry faster than usual inks and exhibit brilliant prints. Water-based inks are very good for starters as they are simple to wash. Also, selection of colors should be done according to how your ink affects the final texture and feel of your prints.
- Paper: The choice of paper for printing has an influence on the textured feel of the prints. Use heavier papers such as Japanese washi or printmaking paper to prevent tearing under the printing pressure. Results of various paper types can be surprising, so it’s worth to experiment with them.
- Baren: This device applies pressure during the process of imprinting an ink image on paper. Baren are round devices with a handle on one side, making full contact with the block for the best impression if evenly balanced. If one is unavailable you may also use the back of a wooden spoon in a bind!
Techniques in making Textures
When it comes to picture making with linocut prints, unique textures are an artist’s choice, there are a wide range of techniques available for one to make use of. As an artist, there is this amazing ability to combine materials and processes with the aid of texture to narrate one’s work. Let us dive deeper into some of the techniques that will help you create cutting edge laser art.
Carving Techniques
How linoleum is carved directly influences the texture of the final print. One such method that is mostly used is crosshatching. This is done by engraving lines that intersect on the surface of a linoleum surface. What do you get? An amazing shaded outcome that gives depth to your piece. Cross-hatching was the first technique I dare to try, it was inspired by the work of the artist Friedrich Dürer, who was superb in this technique. I remember being absorbed in the rhythmic drill of cutting lines, each of which presented me with an intricacy of its own.
Equally as impressive is another technique known as stippling. This creates an effect where rather than drawing lines, textures are composed out of little dots or marks. Its a technique that can give an outcome of soft gradients rather like what is seen in a water color painting. Rachael Smith is an artist that makes proper use of stippling, and the precision puts life into her delicate animal portraits with the use of countless dots. I felt like I was watching magic when I watched her create; it made me realize how something so simple could yield such complex results.
Trying out all these carving methods not just helps in contacting your work at a more personal level but also assists you in discovering your unique carving style. Every technique carries a different narrative, and part of the fun of getting back to linocut printing is identifying the narrative you connect with.
Inking and Its Applications
Let’s now discuss the inking techniques. I would say this is the part where you get to show your imaginative side. The kind of ink that you would use would greatly affect the quality of your print by altering the texture. For example: oil inks give a beautiful shiny sheen and enhance the quality of the prints’ color. The only con is that they are harder to clean. On the other hand: water based inks are easier to use especially in the hands of a novice. Not only are they easy to use but since they dry faster which is a good thing as it gives a matte finish and a textured surface, they are more versatile.
Alternatively, soft rubber brayers can be used, gouging more ink onto the block and making a deeper imprint while harder rollers make textured prints by allowing sections of the block to show through. The finished product is directly dependent on the type of roller used. During my first use of soaking varied rollers, I was taken aback by how profound an impact each decision had on the end result as it reminded me of an artist when picking a specific paintbrush. It follows that: ‘Blanchard considers combining multiple impressions as a layering technique.’ One of the artists who mastered this technique is Hannah Hoch, one of the first artists to use collage and printmaking. Her ability to join many components into one piece is truly impressive.
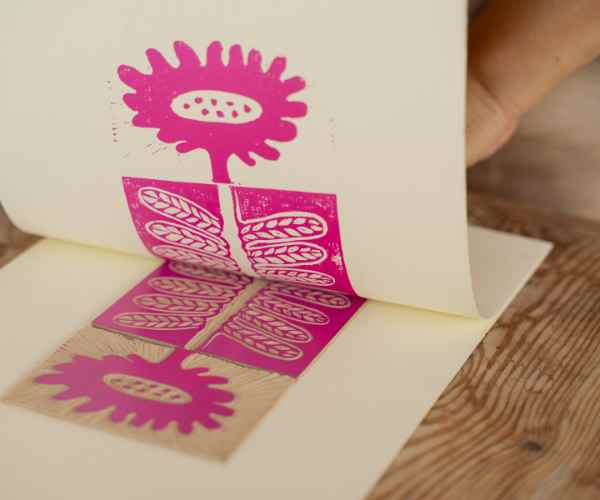
I remember going to a workshop where we worked with layering, so to begin with i searched for a floral design and then proceeded to print a colorful background. After that I proceeded to print a second design featuring stems and leaves. Amazing print layers are created with depth! Layering allows you to expand your thinking as you’re not limited to a single print but rather how each layer complements the other. This adds depth and complexity to the final print.
Advice For The Newcomers
There are practical tips for beginners to assist you with your Linocut journey. Above all, be bold in attempting new things! Try different carving and inking techniques, and don’t hold back from making mistakes. Mistakes are but a form of learning as they lead to surprising and more often majestic results.
Begin with basic designs and as you become more familiar and comfortable with more noise tools, raise the difficulty. The early prints I made do not ring any bells as I understand that they were not how I envisioned them to be. These were not failures, but rather stepping stones to my Linocut one-off voice being unique. So, don’t be afraid to alter the style as that’s the best way to grow into your own.
Finding Inspiration
When searching for inspiration, the world is truly yours. From the environment and structures to other artists’ work, there’s a surplus of resources that you can use to draw creativity from. There’s this one artist I met, who used to draw inspiration from the intricate patterns found on butterfly wings, not only did she obsessively observe the wings but would also spend her time translating the drawings into linocut prints, which served as a constant reminder for her, that the small details can lead to the biggest ideas. The work of this particular artist is a stunning example of the creative potential of nature.
Another great way to gather inspiration is by exploring the local galleries close to you, or by going on long walks in the parks nearby for some fresh air or even joining art communities online. Engaging in idea exchanges is always fun and can resonate well with the work you want to do. One such instance for me was the community art event where i showcased my work in front of an audience and seeing the creativity of everyone else present alongside me. I went home inspiring and energizing me to work on my linocut print practice.
FAQs
What materials are best for laser cutting?
Using the right tools for linocut printing will not only ensure success but will also allow for a more engaging experience.
Linoleum Blocks:
These are the foundation of your linocut prints.
You might want to look into using soft linoleum as a carving surface since it is the easiest one to use, especially for beginners.
Carving & Cutting tools:
It is very important to remember this. Purchase good quality carving tools.
I used the Speedball linoleum cutter set, and it works very well for me.
This includes many blades that enable you to try out various carving methods.
Inks:
It is important to ink the linoleum properly.
Picking the right ink is key.
Water-based inks are great for new users because they are also easy to clean.
If you’re looking for bright colors and a glossy finish, oil inks are worth the time it takes to clean up afterwards.
Brayer:
A good brayer will be a good ally to make sure the blocks you will add ink on are evenly coated.
I first started with a plain rubber brayer, so I had to buy a soft rubber one in order to get a better result, so I noticed an improvement in how my ink was picked up when stamping onto the block.
Paper:
Lastly, think about what kind of paper will be appropriate for the print you will make.
Japanese rice paper or printmaking papers are best to suit this as they are ink able and resilient enough to withstand the strain of the printing process without ripping.
For someone who wants to create linocut prints do I require any experience?
Yes, it is possible!
A large number of us have very little or no knowledge of linocut printing.
What is critical however, is an interest in how videos are made and the desire to experiment with them.
It always feels good to recall my very first linocut print, which I remember to be a simple mx flower design and with it, I remember not having a clue of what I was doing. But the more I went onto carving and printing, I distinctly recall a feeling of excitement. Now moving on to YouTube, this platform alongside online courses can be a great and informative resource as tools to help you out with the basics. It is recommended to start off simple and do not fear to commit any mistakes. What does take place is that each print do teach you something new allowing you to find your inner unique style.
What Are The Common Linocut Mistakes To Avoid:
What are the common mistakes when you are starting with Linocut?
That being said, everyone makes mistakes, especially when beginning with linocut printing. Here are a few common mistakes I made and here is how to avoid these mistakes when you start printing for the first time:
Skipping Carving Slowly It’s Easy To Think About Getting It Done Quickly, But It Is Best To Take Your Time:
As it happens this usually leads to a lot of frustrating moments, this stems from the problem of rushing. There are plenty of times where I have had the problem of carving too deeply this causes great frustration. One thing is certain always take your time as patience is definitely in key.
Additionally, moving on to Inking Too Thick, Avoid Applying Too Much Ink As A rule of Thumb the More Ink Used on the Printing Plate, More Ink is Applied Onto the Paper:
What commonly happens while starting is slathering the ink on as this causes most messy prints thinking more is better most of the time – a thin and evenly spread layer is all one requires.
A few attempts were needed before I understood that being mild in touch yields sharper prints.
Note: Test Prints Are Not Done:
Always do test prints before working on your final piece.
This way, one can visualize how the finished product may look and modify it in the required areas.
A test print or two has always prevented me from some undesirable results.
Not Caring For Your Equipment:
Your equipment are an asset!
Make it a point to wash your brayers and carving tools as it makes them last longer.
There was this incident when I stopped using my brayer and it completely dried up with ink and inking became tough.
So wash them as often as you can.
What about the linocut tools I have – how do I take care of them?
It is fundamental for you to preserve your linocut tools in order for them to be effective and durable.
So this is how I maintain mine in good condition:
Post Use Cleaning:
Use warm, soapy water after every print to wash your tools to get rid of ink that may have stuck to them.
For more complex ink matter, a bit of rubbing alcohol works fine.
Clean your ink stained tools immediately after use to save yourself the trouble of cleaning dried ink.
Correctly Putting Them Away:
Do not leave the carving tools everywhere, make sure to always put them in their protective holders.
Before discussing the use of wood in carving, let me specify that I store my carving blades in a wooden case that is cushioned adequately to avoid excessive damage.
Sharpening Your Tools on Regular Basis:
You should begin sharpening your carving blades routinely to make cleaner cuts with it.
I can employ a sharpening stone but do take care while using it!
It is all too common during sharpening for someone to inadvertently slip and this is something that must be avoided.
If safe handling is practiced, then it should ultimately be noted that tools are far more dangerous than they are sharp to begin with!
Nonetheless, if you do take care…
Conclusion
Combining linocut techniques to form individual textures is not merely in the making of prints, but in generating fresh new opportunities for self expression through one’s art and expanding the scope of artistic creation.
While experimenting with a dozen of other techniques, it sufficed to say that every such technique enables one to put a little bit of oneself into one’s works.
Moreover, for the more seasoned artists and for those who are only beginning to embark on their artistic journey, the take away from this is that it does not matter where one begins, the process is as vital as the end.
I encourage you to go surplus with your creativity.
Squash that carving tool, grab your favorite colors, and complete all the experiments you ever wanted to do.
After all, at the end of the day, art is about experimenting, and Linocut is one of the best tools you can use to create something that is one of a kind and unlike anything else you have ever seen before.
Art is still art no matter how it is done, and making art is something that should be cherished and enjoyed to its fullest.
Every new print is a new chapter and new set of tales yet to be told by the artist.
Now don’t wait up, make use of this amazing technique and let beauty pour out of you effortlessly!;