Put your hands together folks, for we are about to talk about portrait drawing, which is intimate and a single glance capturing the likeness of people on paper is one rewarding experience. As a person who draws, subtle intricacy and close attention to detail makes portraiture an incredibly fulfilling form of art, albeit one that comes with its challenges As a person who draws, subtle intricacy and close attention to detail makes portraiture an incredibly fulfilling form of art, albeit one that comes with its challenges Portrait drawings show a sense of emotion towards the characters and enable people to connect deeply to them regardless of knowing them or not, and by using a sketchbook to practice. Consider Van Gogh, Rembrandt, or even Frida Kahlo. All of them preferred various methods of drawing self-portraits, but they were all great because they could get across who they were. If you are clueless on how to improve your skill set further if you are a beginner or have been doing portrait drawings for a while, you might be interested as this article is for you. We are taking a look at portrait drawing tips. This is more than merely acquiring skills or strategies; it encompasses improving your self-assurance and your growth as a distinct artist.
As I sat down to draw a portrait for the first time, I found myself feeling daunted by the intricacies of the human face. I still recall the first time I tried to make a likeness of a friend’s face, why it was a catastrophe! I was over-concerned about detail and ignored the most important thing: proportion. I ended up creating an image that looked more like a cartoon than a real person.
Here’s the thing though: every artist has to start somewhere, as I did! Through hard work and willingness to indulge in lots of trial and error, I managed to find my groove. That being said, let us go on this journey together and see the basic things that would help you learn how to draw a portrait.

The Importance of Proportions
Let’s touch on the elements of proportions. Getting those proportions correct is vital because they act as the outline to the structure and completeness of the image you wish to create. It’s like trying to build a house without a solid foundation; it will cave in! In the same way, one’s likeness will be distorted if your proportions are inaccurate. So, what do we mean when we say proportions? It is really the relationship of distances and sizes between the different parts of the face to each other. A simple technique I like to use is the “egg method.” Imagine an egg, yes, the breakfast one! The concept is that the basic structure of one’s head is roughly in the shape of an egg with the wider portion on the low end. Here’s an interesting calculation that might interest you Here’s a step by step method to get you underway: Imagine the face as being divided between 3 equal parts placed up down vertically, drawing three levels of symmetry, the first from the apex of the hair to the eyebrow, the second from the eyebrow down to the base of the nose and lastly from the base of the nose to the chin.
Then in the horizontal dimension split it into five equal portions, the breadth of the face, which may be easily achieved by determining the breadth of the eyeballs – it can be assumed that there is an average space of one eyeball in between both eyeballs and the outer corners of both eyeballs are in line with the border of the face.
These simple guidelines can make a world of difference!
When I came across proportions for the first time, I picked my painting practice from photographs and from real life. With each attempt, I began to understand how a human head is constructed. It’s all about training your eye to see such relationships.
Wrong Composition but The Right Materials
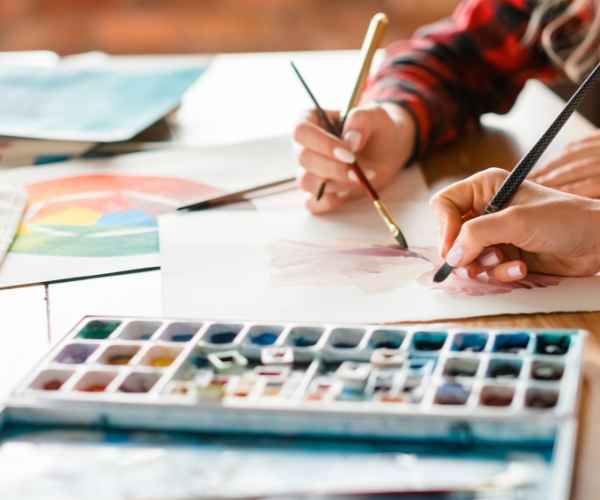
Now that we have a grasp on proportions, let’s talk about the tools of the trade (the materials)!
If you own relevant tools while doing portrait drawing, then your experience, as well as the result, can be quite beneficial.
Let’s start with pencils. My suggestion is to have a selection of pencils ranging from hard (H) to soft (B). Hard pencils produce thin lines as well as outlines but soft pencils make it better because deep rich dark shadows can be created with them. Personally, I have always been partial to pencils, especially the grade 2B. It is best because it allows you to do both precise and shading work somewhere in the middle.
Next up, let’s talk about paper. The type of paper that you use for your portraits matters a lot. So look out for a smooth drawing paper that permits the addition of multiple graphite layers. The paper that I enjoy using in particular has a bit of a rough finish, giving the drawing a nice feel. There is absolutely no denying that it can convert moderately good work into amazing work, Once more, So why bother with the assistance of paper?
In case you forget, I find kneaded erasers most useful since they are best for removing graphite and do not tear the paper. One day I was caught off guard when I understood how important it was to keep erasers handy. I made a mistake during a portrait session and smudged a minor detail of an important feature and a kneaded eraser made it possible to simply fix it within the texture.
As a reminder, the tools you select can dictate the nature of your creative journey so make sure to try out different options until you meet what appeals the most to you. That makes it fun as every artist has their own liking!
Skills Development Strategies
Observational Skills
Now that we have the foundation in place and talked about proportions and materials, it is time to focus on the upside of portrait drawing: observational skills.
Observation is the backbone of any great work of art, especially for portraits. This means training your eyes to observe deeply into a face. Remember, every wrinkle, shadow, and highlight is a story. If you are interested in portraying it, then you will have to become a keen observer.
One of the best ways to develop any skill is by practicing every day. Yes, I know that is cliché, but allow me to! Spare about 10–15 minutes every day to draw something based on life, be it a friend, a family member, or just a random person sitting in a café.
I recall one summer I was working on ideas where I drew people in my local park. I had a sketchbook with me all the time and I looked for what was different about the faces. What began as just warm-up practice turned out to be very educational. I began to differentiate between the ways that people smile, frown, scowl, stare into space, or shift their eyes. These little nuances became the basis of my portraits that I wanted to look as close to a real person as possible.
And to enhance these skills, try this little exercise: Take a picture or a live model and set a timer to 5 minutes.
During these intervals, pay attention to every intricate detail without gripping any form of writing tool. When the timer expires, draw what you are able to recall. Through this exercise, you stimulate your ability to recognize more important elements and outlines which will enable you to capture your audience with great and accurate portraits.
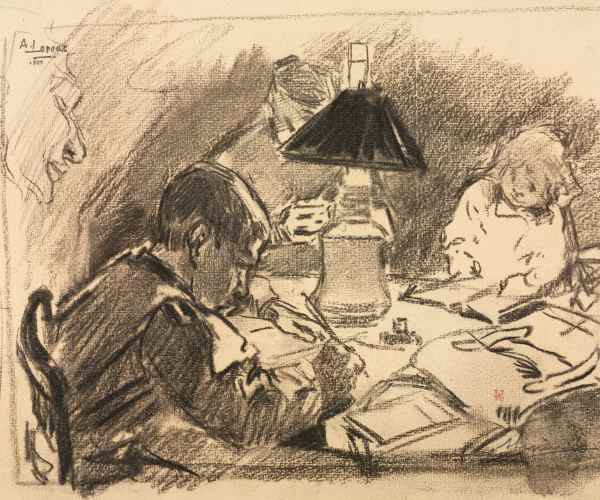
Light and Shadow
Adding light and shadow is the next step in the process.
When making a portrait, being able to fully communicate with the person is valuable because it helps you understand how light interacts with the face. Light defines the contours of a face, and shadow creates tension and depth. And once you learn to work with these parameters, you will be able to paint except for delicate lines, but incredibly realistic pictures of people and animals.
Thus, try to see how the light illuminates the person you are drawing. Try to spot the lightened parts which are highlighted and the areas which are darkened. Light, I believe, performs the function of a sculptor; it shapes out the features on the face and exposes the three dimensional aspects of it.
For shading try employing hatching and cross-hatching techniques. Hatching consists of running parallel lines to shade an area and cross-hatching is drawing lines that intersect focusing on providing a deeper tone. I recall cross hatching being the very first moment I felt like a door was being opened! The more layers I added, the deeper the shading became. This changed my portraits from outlines to 3D.
Another tip? For the darkest areas, work with soft pencils, such as 4B or 6B, and combine using a tortillon or a finger to obtain soft transitions. Don’t be scared of trying new things! Remember, light and shadow are always your partners in realistic portrait creation. So, just continue experimenting with what you think may work best.
Facial Features and Expressions
Now let’s narrow it down — facial features and facial expression.
Every portrait must contain this in order to have life- the artistry to take every feature and make it stand out. A portrait helps to capture the most basic of features which makes the person stand out, such as the eyes, nose, mouth or even ears. Each of these can be molded including the distance from the eyes to the shape on the nose and the curve of the lips.
One of my top approaches would be to split each feature into fundamental shapes. The eye as an example can be viewed as an ‘almond’ shape , the nose to a triangle and lips to a gentle curve. So rather than looking at it all at once, start with these shapes and try to add detail gradually.
So we’ve covered techniques so far and we’ve covered shapes and features and now finally it’s time to talk about emotions, and that’s where practice comes in, observing. What am I looking at? How do people’s facial expressions change during different feelings? For example, a smile is not only a raised mouth at its edges, it is a relentless squinting of a person’s eyes and the shifting of a person’s shadows on their cheeks. I had a realization one day when sitting at a family party and sketching my niece. She was laughing and I couldn’t believe how different her face looked in that cheerful moment than when she was thinking so intently.
So let’s say, take a photo of people showing different emotions and during your drawings try to show the same emotions and rather than just trying to reproduce the image better, you will have a much deeper understanding of how emotions are actually expressed in our features.
Practice Makes Perfect
And with practice comes improvement and so that leads us into our next point. And that’s the need for regular practice.
Let me reiterate this to you, if you wish to improve your craft on a consistent basis, you should be able to partake in the drawing challenge that is available at your disposal. Taking out 15 minutes to either draw or study each day will be able to boost your muscle memory and confidence.
For example, I remember that I challenged myself to create 30 portraits in a span of 30 days. Each day I would pick a different person and draw them. This challenge was both exhausting but rewarding! It allowed me to not only find several ways to improve my technique but also allowed me to gain insight on how faces as well as their expressions can be viewed.
You won’t achieve perfection in one go, and you should not have such expectations! Instead, the core goal should be to constantly grow. So naturally, when you make mistakes, take that as an opportunity to learn!
Seeking advice can be quite daunting since sharing your work is often the best and fastest way to improve as an artist! All the advice you receive enables you to view your artwork from a new angle and gives you the chance to improve drastically.
Search for artist spaces or fan-base such as social forums or groups on social media. For instance, I came across a fascinating community on Instagram where artists showcase their work and mentor each other and I found that astonishing. The support that I got from other artists was extremely beneficial, thus pushing me to improve myself.
One can simultaneously think about enrolling in local art groups or classes. From my point of view, sharing a space with fellow artists where learning and idea sharing taking place is significantly enriching.
Once again, don’t forget that making an art takes time, and each artist goes through the entire process. There’s always a process of getting better, and appreciate that development and ask for help if you need!
‘FAQs’
What are the best tips for beginners in portrait drawing?
If you are now thinking about portrait drawing for the first time, then be ready for some thrilling activities, well quite some adventure actually – and Here are my recommendations to guide you through the process:
Begin With Basic Shapes, such as circles andoval: Construct the face out into 3D shapes. The focus of this is to help you get refused to get used to details while you hone in on proportions.
Practice Regularly Schedule a time every day for drawing for example 10 minutes a day, you will get used to it faster with regular sessions.
Utilize image sources: The most aesthetically pleasing piece of art substituting images for subjects and tri-dimensional objects within the scope of constructing new art, is precisely an effort in merging image sources with which sophisticated subjects and objects can be derived. And for last, images in conjunction with live models demonstrate all hands on an endless variety of perspectives, angles, features and in particular their interrelations, their proportions to each other.
I don’t think you should be scared of making mistakes and making them a part of your growth. I was sketching a … friend’s portrait once and scoffed off the proportions. Instead of being sad about it, I just asked myself.where did I go wrong? This helped me improve.
What can I do to enhance my shading skills when drawing portraits?
Shading literally breathes vitality in a portrait – that impeccable finishing touch! Now, how to improve on grounding while rendering your portrait? Here are a few pointers:
Light Sources: Notice how the face’s upper area radiates light and the bottom part darkens in shadow. The variations in shadows are infinite. Just remember that one time I took a normal lamp and positioned it against my face so as to drench one of my cheeks in darkness and after doing that my perception of light shifted drastically!
Blending Practice: The effect of blending tools like tortillons or even fingers, helps to ease the pencil strokes which in turn, creates a more believable work of art. Don’t feel embarrassed to rub your fingers against the drawing, it is one efficient way of determining the texture of the portrait!
Have Open Ended Pencil Grades: Use deep graded Pencils (6B) for negative imagery and H pencils for head-shots. The best part about this is that the contrast will be much more vivid in your final work.
Value Scale Creation: Chiaroscuro consists of shading that styles ranging from dark all the way to light. Get comfortable with painting in multiple shades first and then use portraiting so that you can get the deep nuances needed for the final strokes.
What are some common mistakes to avoid in portrait drawing?
We always make mistakes but knowing the mistakes can help you to avoid some headaches. So, here are a few to look out for:
Ignoring proportions: Leaving out proportion measurements is one of the major mistakes that one can commit. Always check again the orientation of facial features.
Focusing too much and too early on details: Getting into details without a study of a solid base is quite common. Start by thinking about overall shapes and proportions.
Not observing your subject too closely: No matter if you’re working from life, or from a photo, spend time observing. There’s no need to hurry with this step; it’s crucial for likeness accuracy.
Avoiding constructive criticism: Feedback is one of the things I am not afraid of, no, I take it with a shout! I gained a lot from attending art classes, where fellow students were helping me improve my practice with their thoughtful speech.
How important is it to study anatomy for portrait drawing?
Anatomy might not be the easiest thing to study especially for portrait artists but it is a great asset to have. Learning about the face will help you depict in a much better way.
Know the bone structure: You will be able to enhance to understand proportions better if you know what the skull is and what it does to the shape of the face.
Examine muscle groups: Muscles control how our faces move so knowing where they are located is useful for developing more facial movements.
Use anatomy resources: Get yourself an anatomy book or an online course designed for artists. I personally learned a lot from resources that analyzed and examined the parts of face and their functions.
My portrait drawing skills have not improved despite my practice, are there exercises that can help?
Without a doubt, here are a few exercises that have been life altering to me that I recommend to you:
Timed sketches: If you wish to get better at quick as well as efficient drawing set a timer for 1-5 minutes and work within them. Doing this sketching exercise will help you capture the essence but not pay much attention to details.
Blind contour drawing: This is a unique technique that requires you to take an outline of a face without looking at the paper. People recommend this exercise for improving observational skills for better connecting to the subject.
Copy the Masters: Portrait artists you admire most likely have their own collections of portraits so get even further inspired by them by copying the works that they adore most and adapting new ones that are more suited for you. Focus on a technique that you would normally avoid.
Self-Portraits: Repeatedly sketch yourself, as I said, to comprehend better proportions and particular features about them that may be more fascinating than they appear.
Conclusion
I would also want to emphasize that there is never a straight route to enhancement because each obstacle will require effort to conquer, with all this knowledge.
Every creative has their own story, but one thing is true in all of them, and that is the importance of never giving up.
Every technique learned be it proportions, light, shadow and so on goes into building one’s ability as a portrait artist.
Thus, as you start on this journey, try to implement these suggestions as you practice. Set those targets, take on your challenges and with every try, see how you evolve considerably more confident with a pencil in your hand.
Always keep in mind that the key isn’t in reaching the highest mark of perfection, but rather, is in having fun while the creativity flows. And yes, share as well your experiences and artworks as you practice this wonderful art of drawing portraits, because I do want to know about your journey!
Have fun!